![]()
STV 5.0 User Manual
Getting Started
What is the Sensible TableView Framework?
Sensible TableView (STV) is a framework that drastically simplifies native iOS app development, while focusing on delivering a simple and enjoyable developer experience. Focusing on such a great developer experience is one of our main core values, and is perhaps the primary reason STV has become so popular in such a short period of time.
Another key reason behind STV’s popularity has been undoubtedly the unprecedented amount of time it saves its users. Based on countless user testimonials and feedback, we have found that developers save on average about 70% of their development time when they start using STV in their applications. What this means for you is that an app that would normally take weeks or even months for you to develop alone, can now be conceived in just a matter of days when you use STV. And this is only half the story. As any experienced developer would definitely agree, the real devil is in the app’s maintenance. It is here where STV becomes really indispensable. Since STV keeps your code very short, simple and straight forward, maintenance suddenly becomes a trivial and enjoyable task.
So what’s the catch, you may ask? Fortunately, there is no catch. Since day one, it has been integral to STV’s architecture to fully expose everything the iOS framework has to offer. This means that you do not loose any flexibility while using STV. Every single thing that can be done with normal table views can still be done with STV, only a lot easier. Have a custom UITableView subclass? No problem, STV flawlessly supports with that. A custom cell? Even better! Custom view controllers? STV’s bread and butter!
All this probably sounds too good to be true, and you should definitely not take our word for it! In the next few sections, you will get to experience first hand what it means to have STV be part of your project. Whether you are developing a simple Core Data application, dealing with complex web services or even iCloud, you will get to see how STV elegantly reduces the amount of work you have to do to an absolute bare minimum!
What's New in STV 5.0?
STV 5.0 comes as a huge improvement to the breakthrough work we've done in our earlier STV 4.0 release. The following is a brief overview of its most notable new features:
- Major Interface Builder plugin rewrite for Xcode 7 and iOS 9 support.
- New Auto Layout generation engine. We have completely rewritten a new engine that automatically generates fully editable Auto Layout constraints for your STV UI. Gone are the days where you have to struggle with manual constraints and runtime Auto Layout warnings.
- New complex UI generation. STV is now able to generate more complex UI in Interface Builder, such as automatically creating sections for your 'Expand Content in Current View' property definitions.
- Richer customization experience. It's now much easier to visually specify custom elements right in property definitions. For instance, you can now specify custom cells for the 'Array of Objects' property definition by simply setting its custom class and custom Xib IB fields.
- A more modern look & feel.
- Full support of the new iOS 9 iPad multitasking enhancements.
- Full support of the new 'bitcode' intermediate language.
- Full Swift 2.0 support.
- 100% backwards compatibility with iOS 7.
- 100% backwards compatibility with STV 4.0.
- Much more! (please refer to your product downloads page for the full change log)
What's New in STV 4.0?
- Visual Interface Builder development.
This is perhaps the most dramatic new feature of all, and it just raises STV to whole new levels of simplicity, usability and productivity. Using IB integration, all data definitions can now be constructed visually right from IB and without the need for any coding!
Sections such as our beloved SCArrayOfObjectsSection can now be dropped right into your table views and visually configured to connect to all your data definitions, again without any coding!
All the UI can now be fully generated and customized right from Interface Builder. And best of all, all the UI is live and updates as you modify your data definitions!
 What to see more of this incredible new feature in action? Check out our UI Customization video tutorial.
All this plus so much more IB integrations we just can't wait to share with you!
Xcode integration. You can now effortlessly create new STV projects in one step using our new Xcode Project Templates. We've even created File Templates for you to choose from when creating new STV related files.
Curly Brace Binding. Gone are the days where you needed to create tags for your custom controls for STV to bind into them. Now simply type your property name between curly braces right from IB and STV will automatically fetch the property value from the bound object and render it in the control! For a control like UIImageView where there is no where to type the property name into, we've created an SCImageView subclass that will allow you to do just that, again right from IB.

- Full support for the new adaptive layout interfaces. STV can now do things like displaying a split view controller whenever a device has regular width (such as an iPhone 6+ in landscape or an iPad of course) without you having to do any special configuration.
- Full support for custom cells with Auto Layout across all size classes. Custom cells now optionally auto-resize based on your Auto Layout rules, even in iOS 7.
- Full support for Dynamic Frameworks. STV now ships with two sets of frameworks: Static and Dynamic. Dynamic frameworks are the new type of frameworks Apple added support for in iOS 8.
- Full Swift support. Everything now from Project Templates to Class Definitions now fully support the new Swift language.
- Better Parse.com integration. Now fully supporting all object relationships and 'try again later' operations when there is no Internet connectivity.
Minimum Requirements
- Xcode 7 or later. It is always recommended to use the latest Xcode version, so make sure you always get the latest updates from the Mac App Store.
- iOS 7.0 or later deployment target. Please note that applications developed with STV 5.0 will not function properly on devices using iOS versions prior to 7.0. The latest statistics released by Apple show that more than 97% of iOS users have upgraded to iOS 7.0 or later.
Installation
As of Xcode 8, Apple has disabled support for all third party Xcode plugins. In order to get STV's plugin to work and continue using STV's IB integration, you will have to unsign Xcode. It goes without saying that unsigning Xcode could have unpredictable results in future Xcode versions, so always proceed at your own risk.
The following steps must be performed each time you update Xcode:
- From the unzipped STV package folder, double click on the file called UnsignXcode.
- Select 'Unsign Xcode' from the provided menu, then follow provided instructions to get Xcode unsigned.
- Select 'Update STV Plugin Compatibility UUIDs' from the provided menu, then follow provided instructions to get STV's plugin compatibility UUIDs upgraded to match your current Xcode version.
- Select 'Quit' from the provided menu.
If anything goes wrong during this process (unlikely as of the time of this writing), you can always restore the original signed Xcode by running the same script again and selecting 'Restore signed Xcode' from the provided menu. If all fails, simply delete Xcode and re-download it from the App Store. If you restore the signed version of Xcode, make sure you also uninstall STV's plugin, otherwise the signed Xcode will crash.
After downloading your STV package(s) from your STV community downloads page (you must be logged in to access files), simply extract the package zip file and double-click on the file called InstallSTVXcodeIntegration. If the installation goes properly, STV should give you an 'Installation Successful' message. This is all that is required to fully install STV.
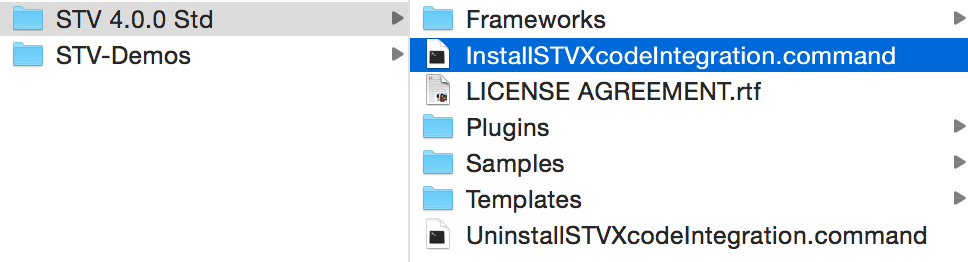
What running this command does is that it installs STV's project templates and STV's Interface Builder plug-in to the Xcode of the currently logged-in user account. To install STV for another user account on the same machine, login in to that account and install again by double-clicking the aforementioned file.
Behind the scenes
What the installation script really does is that it copies some key files from your STV's package folder to certain folders in your home directory for Xcode to find them there. More specifically, the STV template files are copied to the folder $HOME/Library/Developer/Xcode/Templates, and the STV IB plug-in files are copied to the folder $HOME/Library/Developer/Xcode/Plug-ins.
The STV installation process never touches any of your actual Xcode files or any other system files, and you are always free to upgrade/overwrite your Xcode without the need to reinstall STV. Furthermore, we make use of compatibility UUIDs to control exactly what version of Xcode our plug-in runs on, so that our plug-in won't load on any Xcode version that it is not compatible with (e.g. Xcode 5).
Uninstalling
To completely remove STV from your system, open your downloaded STV package and double-click on the file called UninstallSTVXcodeIntegration. To only remove the installed Xcode project templates, navigate to the package folder called Templates and double-click on the file called UninstallSTVTemplates. To only remove the installed Interface Builder plug-in, navigate to the package folder called Plugins and double-click on the file called UninstallSTVPlugin.
Upgrades
Upgrading STV is a common process that you will be doing as we release newer versions of the framework. To upgrade to a newer STV version, simply download the package and follow the same instructions covered in Installation.
Creating a New Project
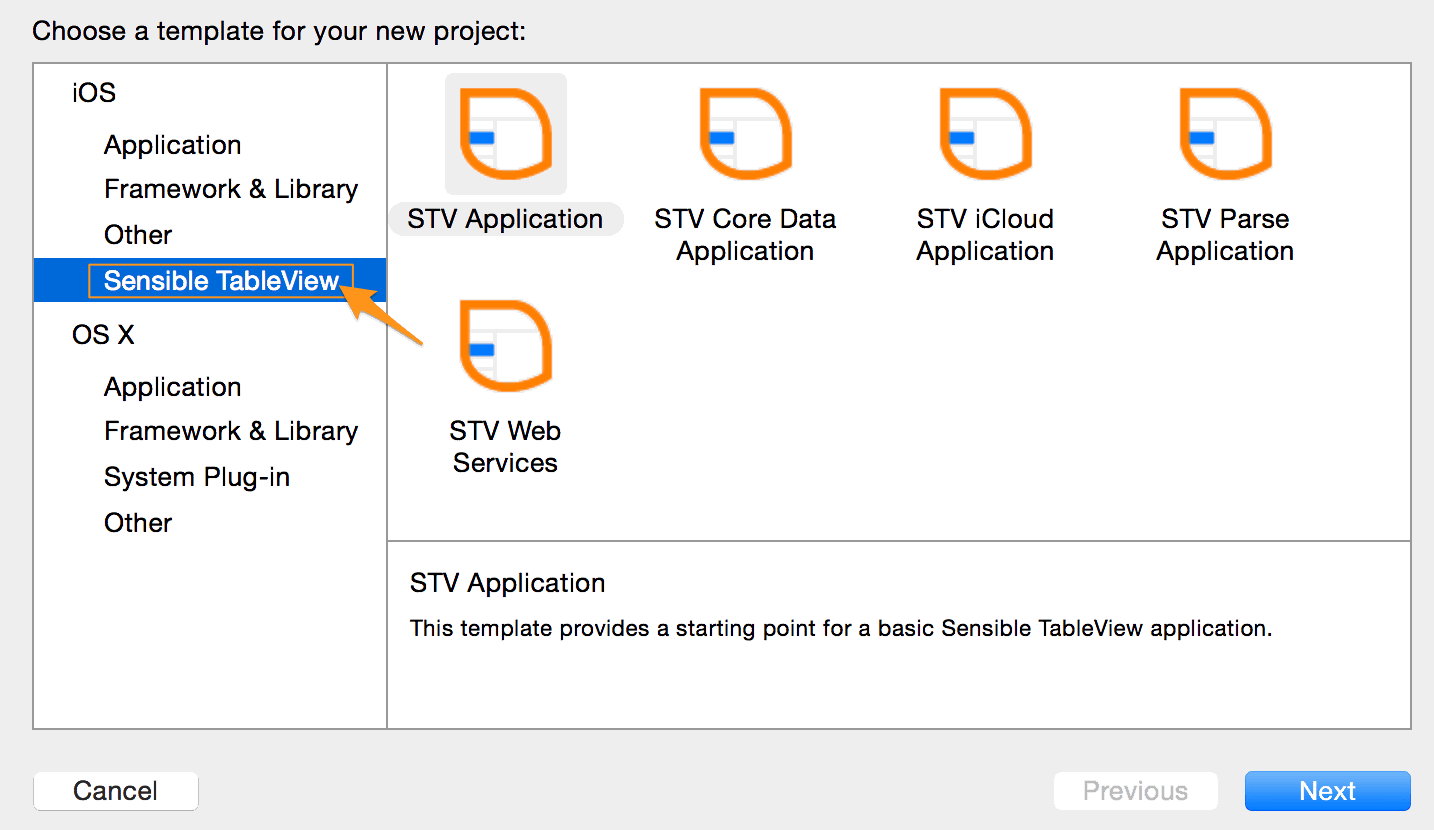
After properly installing STV, you will find that Xcode now has a new iOS project template category called 'Sensible TableView', which makes creating new STV projects really trivial. To create a new STV project:
- Open Xcode, then select File->New Project...
From the project templates screen, select the 'Sensible TableView' category on the left.
- Select the relevant STV module, depending on what type of STV project you're interested in creating, then click 'Next'.
- Enter a name for your project and select your language of choice from the 'Language' drop box, then click 'Next'. STV templates fully support both the Objective-C and Swift languages.
- Select a disk location for your project then click 'Create'.
Adding STV to an Existing Project
You can manually add the STV framework(s) to your app if you have an already existing project, or if you have created your project without using the provided STV templates. You may also want to read this if you'd like to remove your project's existing STV frameworks and replace them with STV source code or dynamic frameworks, for example. STV provides you with several options to choose from:
- Static Framework (recommended). We recommend adding STV as a static framework since it's fully supported by iOS 7 and later deployment targets. A static STV framework can be added by following these steps:
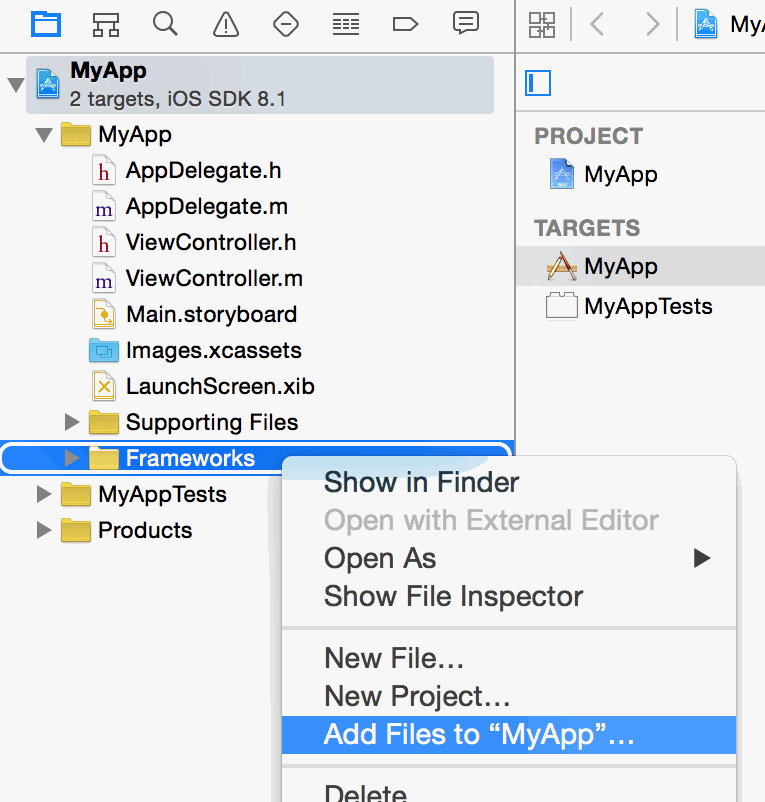
From the Project Navigator, right-click the file group where you would like to add the framework (you might want to create a new group called 'Frameworks' if you don't have one, then select 'Add files to...'
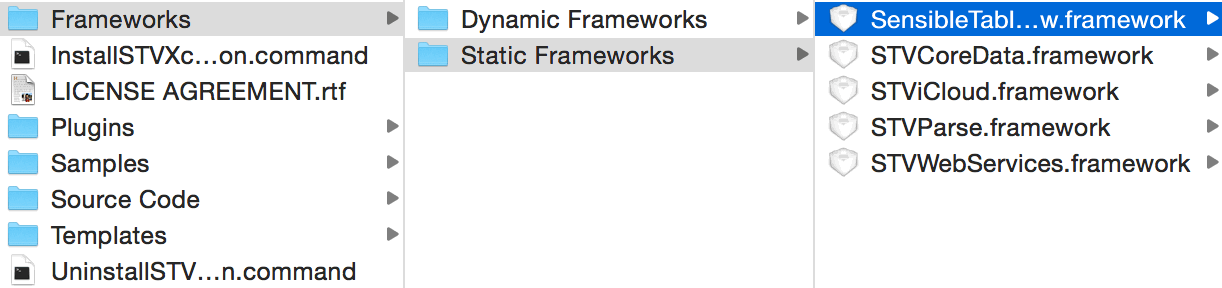
From the file selection screen, navigate to the 'Frameworks' folder inside your STV package, then select 'SensibleTableView.framework' from the 'Static Frameworks' subfolder.
- Choose whether or not you want the framework copied to your project folder by checking the 'Copy items if needed' checkbox, then click 'Add' to add the framework.
- Select your project target, then make sure you have the 'Other Linker Flags' setting (under your project target's Build Settings) set to -ObjC.
- If you're using 'Objective-C', add the statement #import <SensibleTableView/SensibleTableView.h> to your prefix header (*.pch) file. If your project does not have such a file, you can follow this post for instructions on how to create it.
- If you're using 'Swift', add the statement #import <SensibleTableView/SensibleTableView.h> to your bridging header file. If your project does not have such a file, you can follow this post for instructions on how to create it.
That's it! Other static STV frameworks are added in exactly the same manner as above.
- Dynamic Framework. Please note that Dynamic Frameworks are only supported on iOS 8 and later deployment targets. They are however the easiest type to add to your project. A dynamic STV framework can be added by following these steps:
From the Project Navigator, select your main project node, then select your project target. Make sure the 'General' tab is selected and scroll to the section labeled 'Embedded Binaries', then click the small (+) button.
- From the file selection screen, navigate to the 'Frameworks' folder inside your STV package, then select 'SensibleTableView.framework' from the 'Dynamic Frameworks' subfolder.
- Follow steps 5 and 6 from the above 'Static Framework' section.
Other dynamic STV frameworks are added in exactly the same manner as above.
- Source Code (only available with STV Pro). Use the following steps to add STV in source code format to your project:
- From the Project Navigator, right-click the file group where you would like to add the framework (you might want to create a new group called 'Frameworks' if you don't have one, then select 'Add files to...'
From the file selection screen, navigate to the 'Source Code' folder inside your STV package, then select 'SensibleTableView.xcodeproj' from the 'Static Frameworks' subfolder.

- Choose whether or not you want the source code copied to your project folder by checking the 'Copy items if needed' checkbox, then click 'Add' to add the project.
- From the Project Navigator, select your main project node, then select your project target. Make sure the 'Build Phases' tab is selected.
- Click the small (+) button under the 'Target Dependencies' section, then select 'SensibleTableView' and click 'Add'.
- Click the small (+) button under the 'Link Binary With Libraries' section, then select 'libSensibleTableView.a' and click 'Add'.
- Follow steps 5 and 6 from the above 'Static Framework' section.
Other source code STV frameworks are added in exactly the same manner as above.
Exploring Core Data Binding
It is no secret that STV’s Core Data Binding is one of the most sought-after features of the whole STV framework. With Core Data taking care of all your data persistence, and STV taking care of all the UI creation and data input, the two instantly click together creating unprecedented harmony in your projects.
One of the most powerful features of STV is its ability to “understand” your Core Data entities, then create a user interface that resembles their structure. STV also has the ability to automatically create all detail views for relationships between these entities, if you do decide to. Furthermore, STV will monitor and validate all user input and will sync all that back to its respective attributes, automatically persisting all entered data to the Core Data store. And best of all: you can precisely customize every single aspect of the whole process if you wish to, most of the time visually right from Interface Builder!
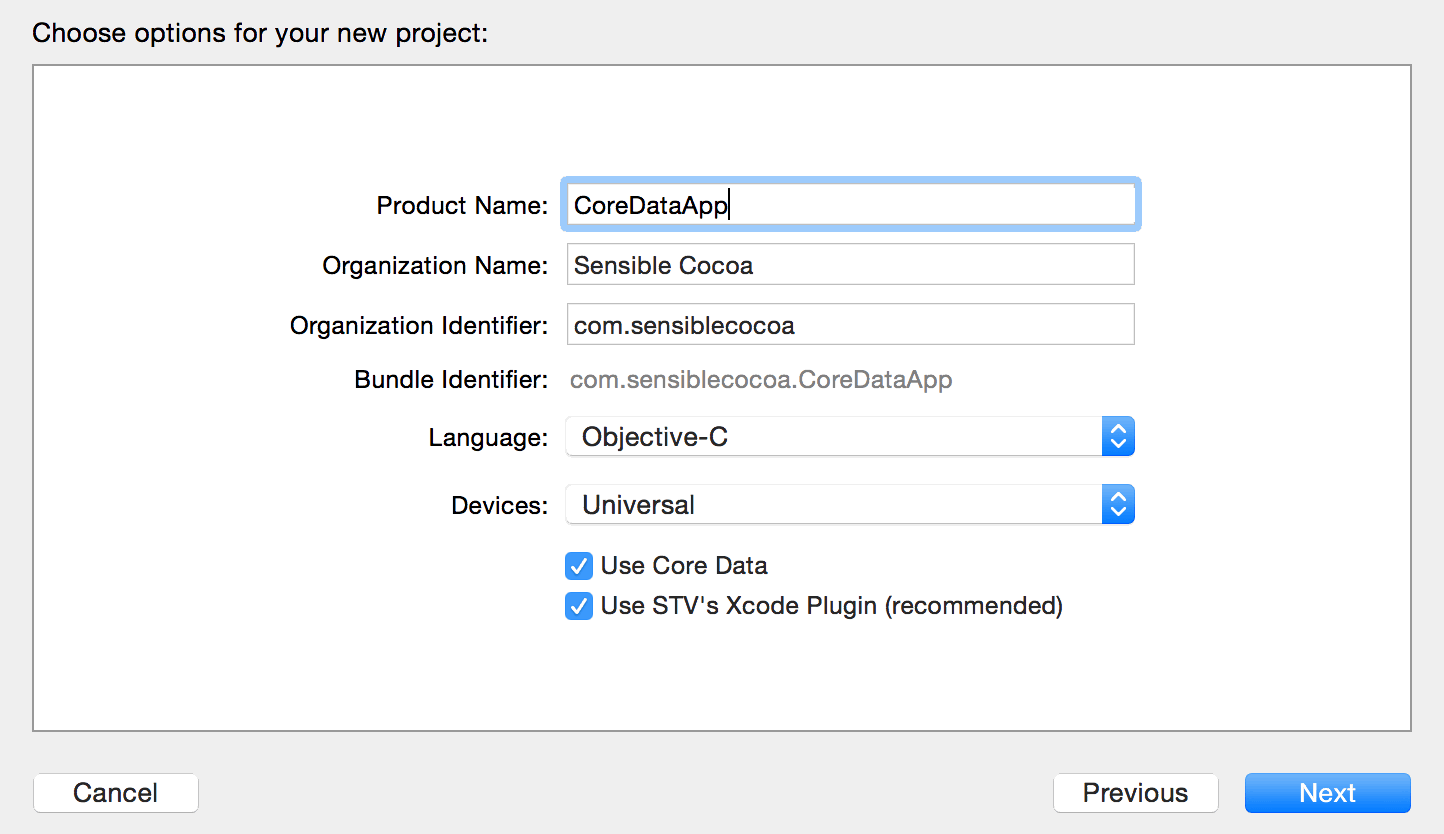
We will start exploring Core Data Binding in this section by creating a simple tasks management application, where the user will be able to enter tasks and specify the required steps to complete each task. To start off, launch Xcode and create a new STV project, selecting STV Core Data Application as your project template. After clicking 'Next', name the project 'CoreDataApp', and select 'Objective-C' as the language of choice.
After creating the project, we'll start by using the Core Data model to add a 'TaskEntity' representing our Task object, and a TaskStepEntity representing each step required to finish the task. To open the Core Data model created by the template, go to the Project Navigator and click on the file called 'CoreDataApp.xcdatamodeld'. Now create the entities by following these steps:
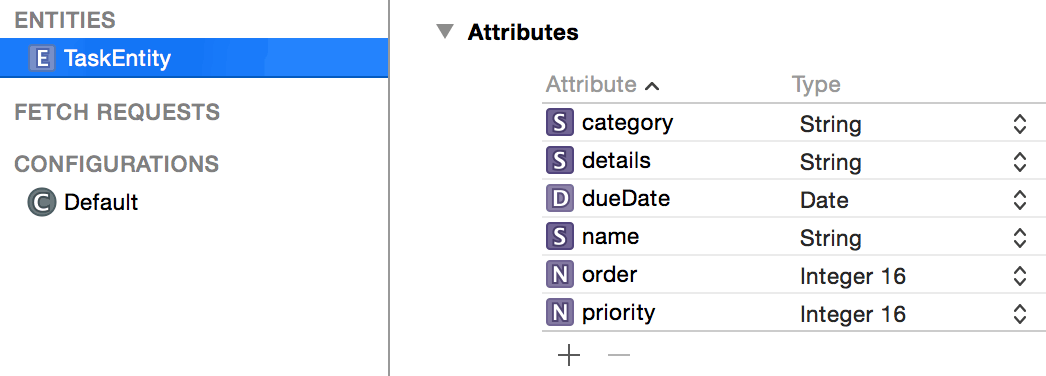
- Click on the Add Entity button to add a new entity. Name the new entity ‘TaskEntity’.
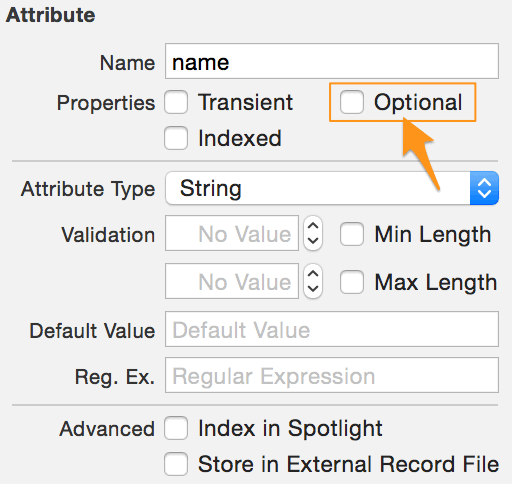
Select TaskEntity then click on the ‘+’ button in the Attributes section to add a new attribute to TaskEntity. Name the new attribute ‘name’, and set its type to String. To have ‘name’ become a required attribute, uncheck the Optional checkbox in the Data Model inspector (make sure the Data Model inspector is visible by selecting View->Utilities->Show Data Model Inspector from Xcode’s menu).
Add the following attributes to TaskEntity (no need to uncheck Optional for any other attribute):
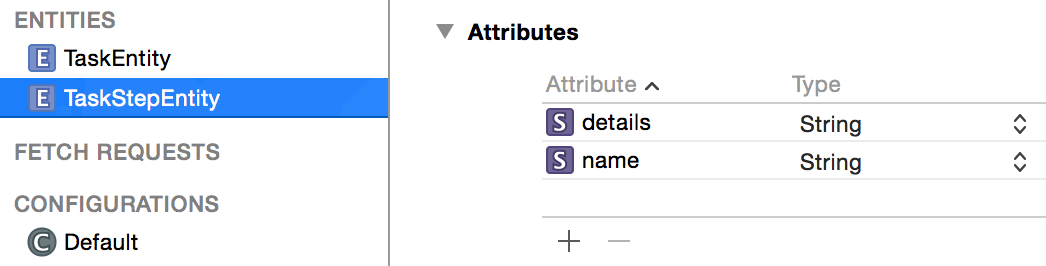
Similarly, add a new Entity called ‘TaskStepEntity’ with the following attributes:
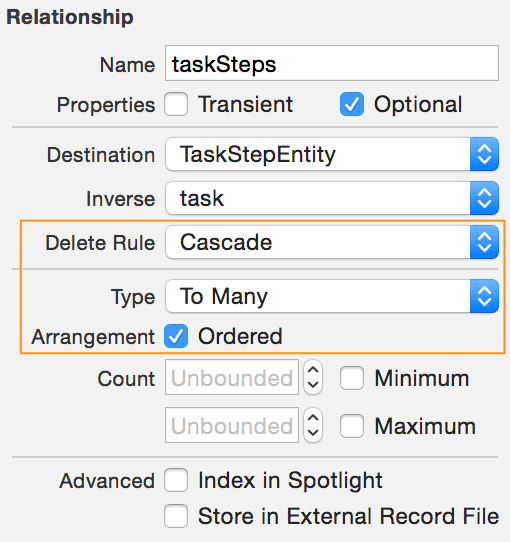
We’ll now establish a 1-to-many relationship between TaskEntity and TaskStepEntity. With the TaskStepEntity still selected, click the ‘+’ button in the Relationships section to create a new relationship. Name the relationship ‘task’, and select TaskEntity as its Destination entity. Next, select the TaskStep entity and click the ‘+’ button to create a new relationship. Name the relationship ‘taskSteps’, select TaskStepEntity as its destination, and select task as its inverse relationship. Now while taskSteps is still selected, use the Model Inspector to select 'Cascade' from the 'Delete Rule' drop-down (this will delete all task steps associated with the task when the task is deleted). Next, select ‘To Many’ from the 'Type' drop-down. Finally, since we would like the user to be able to re-arrange these steps in the generated UI, check the 'Ordered' checkbox right under 'To Many'.
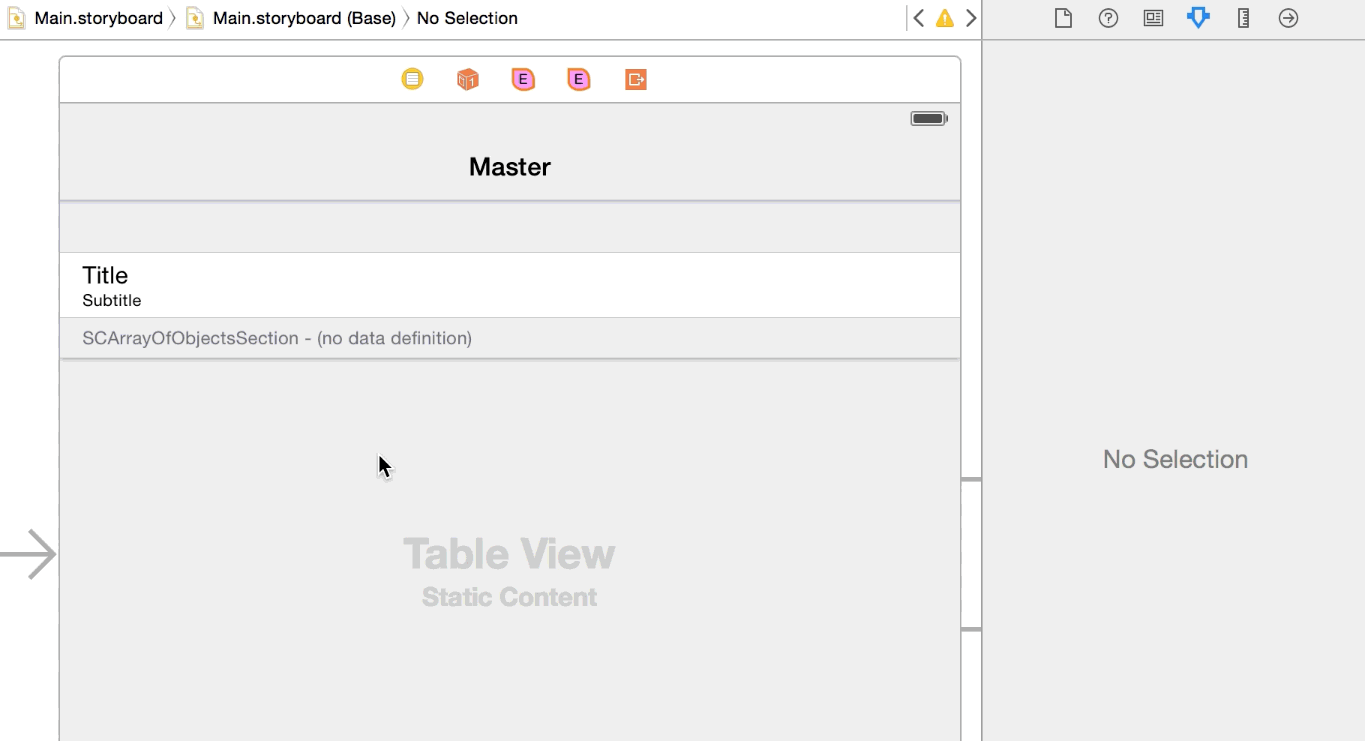
To make sure you did everything correctly, click on the 'Editor Style' button
 and check that the entities have been correctly set up. Your graph should look like the following:
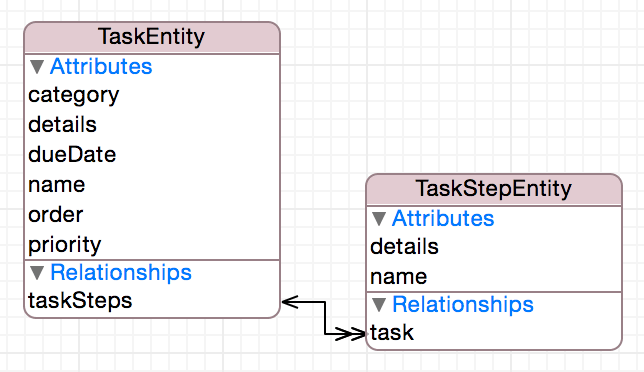
- Save your modified Core Data model by selecting 'File->Save' from the menu, or simply pressing ⌘SIt is vital that you save your model at this point if you want STV to be able to access the newly created entities from Interface Builder.
Now that we're done with our Core Data model, let's move on to our Storyboard by going to the Project Navigator and clicking on the 'Main.storyboard' file. From the Storyboard, we'll create and configure what STV calls an 'Entity Definition', then connect it to the MasterViewController's 'Array of Objects Section'. This basically tells the section what kind of entity objects we'd like it to display, and how we'd like it to display them. We'll do so by following the next steps:
Make sure MasterViewControler is selected by double-clicking on its header, then drag and drop an 'Entity Definition' from the 'Object Library' pane onto the view controller.
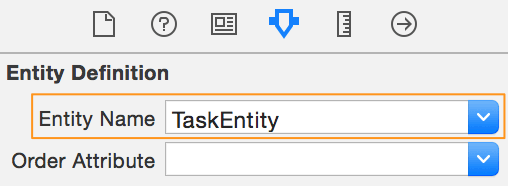
With the dropped Entity Definition selected, open the 'Entity Name' drop-down from the Attributes Inspector and select 'TaskEntity'.
As soon as you do that, STV will automatically fetch all the TaskEntity's attributes into the Entity Definition, creating a list of what STV calls 'Property Definitions'. You are able to access and fully edit this list from the Storyboard's Document Outline.
 Notice how STV has automatically detected the type of each attribute and assigned it an initial UI control relevant to its type.
Still, with the Entity Definition selected, open the 'Order Attribute' drop-down and select 'order' from the list of attributes. This will allow users to freely rearrange their entered tasks.
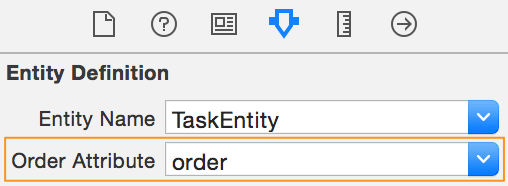 Core Data typically requires you to maintain such an extra attribute to store the objects' order in, since it does not store them in any particular order. Fortunately, STV completely takes care of all this on your behalf.The 'Order Attribute' must always be of type Integer.
- Now configure the Property Definitions in the following way:
- Reorder the attributes by drag and drop so that 'name' comes first, followed by 'details' (original attributes order is the same as the Core Data model).
- Since we won't need the 'order' attribute to generate any UI, delete it by selecting it and pressing delete
- Select the 'details' attribute and set its Type to 'Text View' from the Inspector. This will have it generate a UITextView control so that the user can write more details about the task.
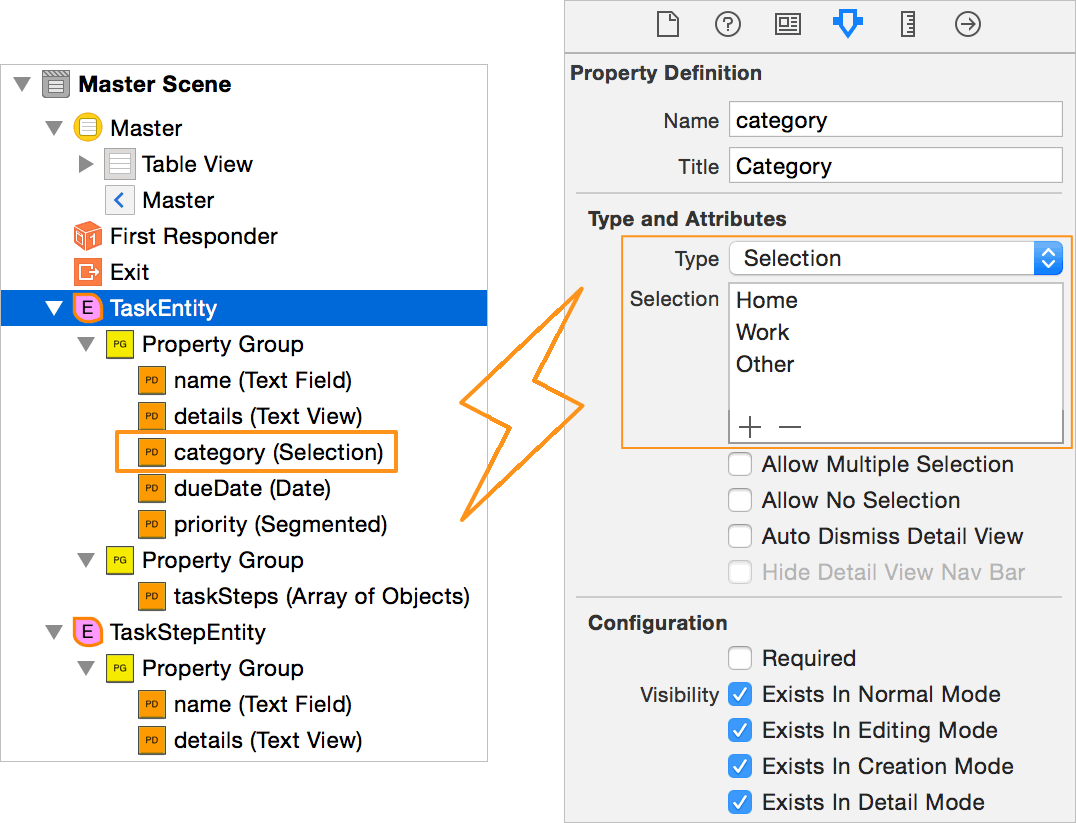
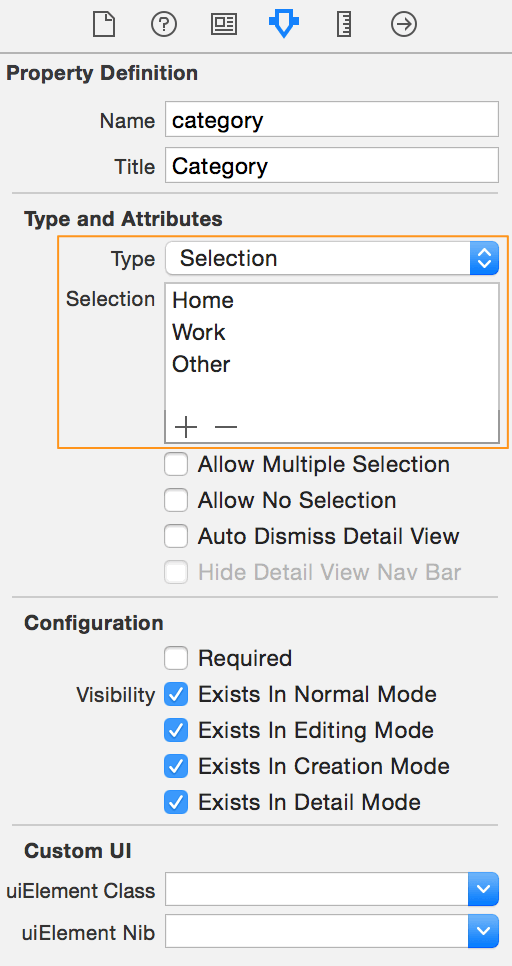
Select the 'category' attribute and set its Type to 'Selection' from the Inspector. Add three task selection items: 'Home', 'Work', and 'Other'.
- Select the 'priority' attribute and set its Type to 'Segmented' from the Inspector. Similar to what we did with 'category', add three segment names: 'Low', 'Medium', and 'High'.
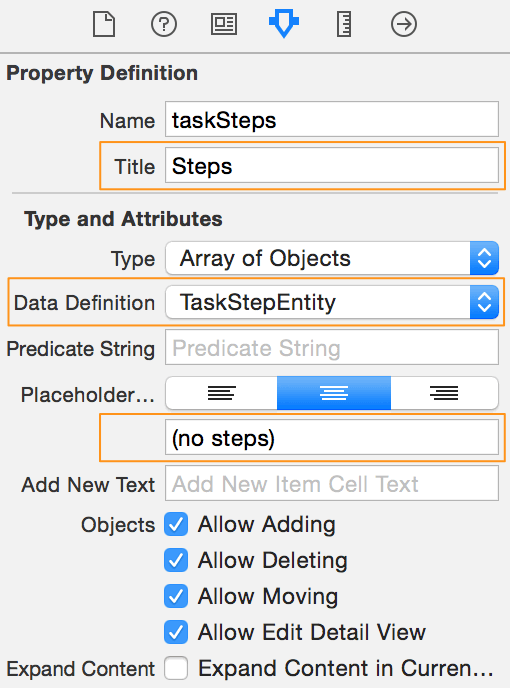
- Select the 'taskSteps' attribute and set its Title from the Inspector to just 'Steps' instead of 'Task Steps'. Since STV has detected 'taskSteps' to be a relationship, it's now expecting us to create and select its detail TaskStepEntity definition in the 'Data Definition' drop-down. Creating the TaskStepEntity definition is very similar to what we've done so far for TaskEntity:
- Drag and drop another Entity Definition from the Object Library pane into the view controller.
- Make sure the new Entity Definition is selected, then select 'TaskStepEntity' from the 'Entity Name' drop-down.
- Rearrange its 'name' attribute to come first, then assign its 'details' attribute type to 'Text View'.
- Select and delete its 'task' inverse relationship attribute, since we don't want to generate any UI for that.
Now get back to selecting the 'taskSteps' attribute of 'TaskEntity', then open the 'Data Definition' drop-down, and select the newly created 'TaskStepEntity' from the list. Finally, set its placeholder text to '(no steps)' (the placeholder is what appears when the user hasn't entered any steps yet).
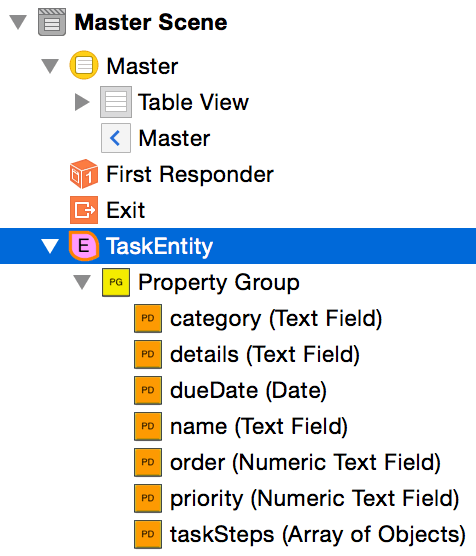
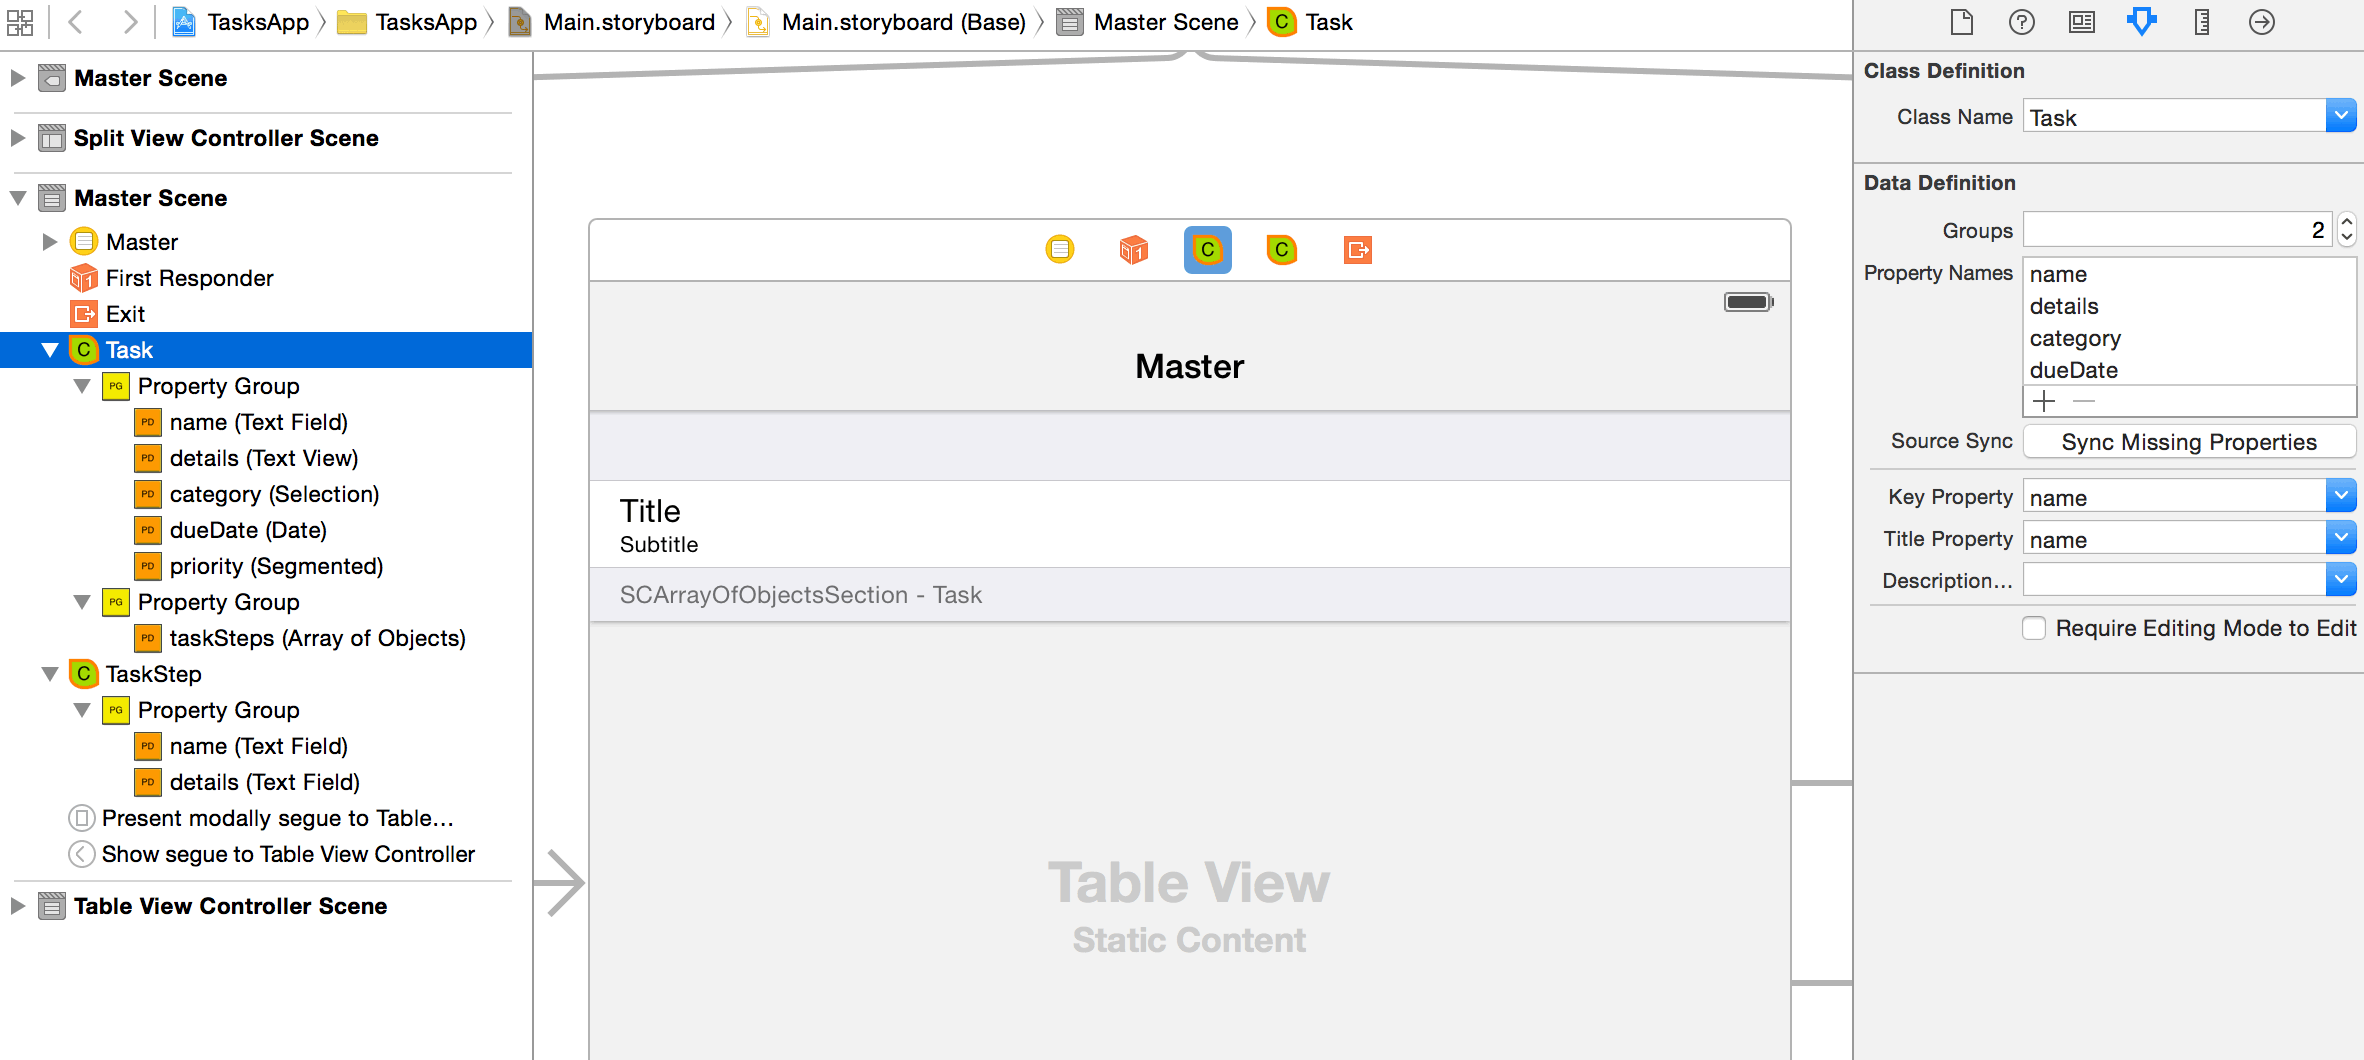
- For the sake of a cleaner UI, we'd like to move 'taskSteps' to it's own section when the UI is generated. First, select the root TaskEntity definition, then increment its 'Groups' field by one in Inspector, giving it a second Property Group. Next, simply drag 'taskSteps' from the first group to the newly created one.
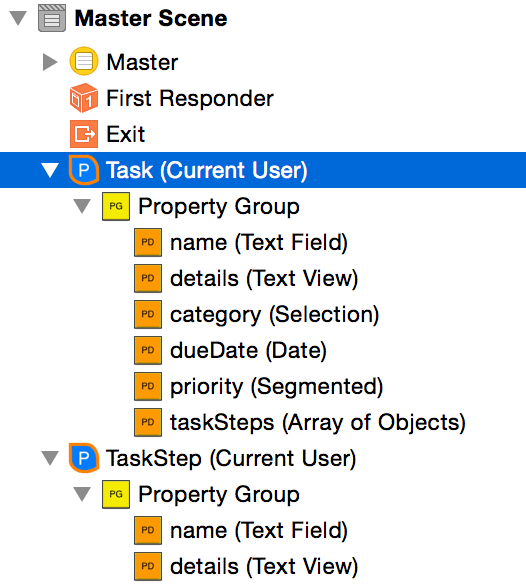
You should now have a document outline very similar to this:

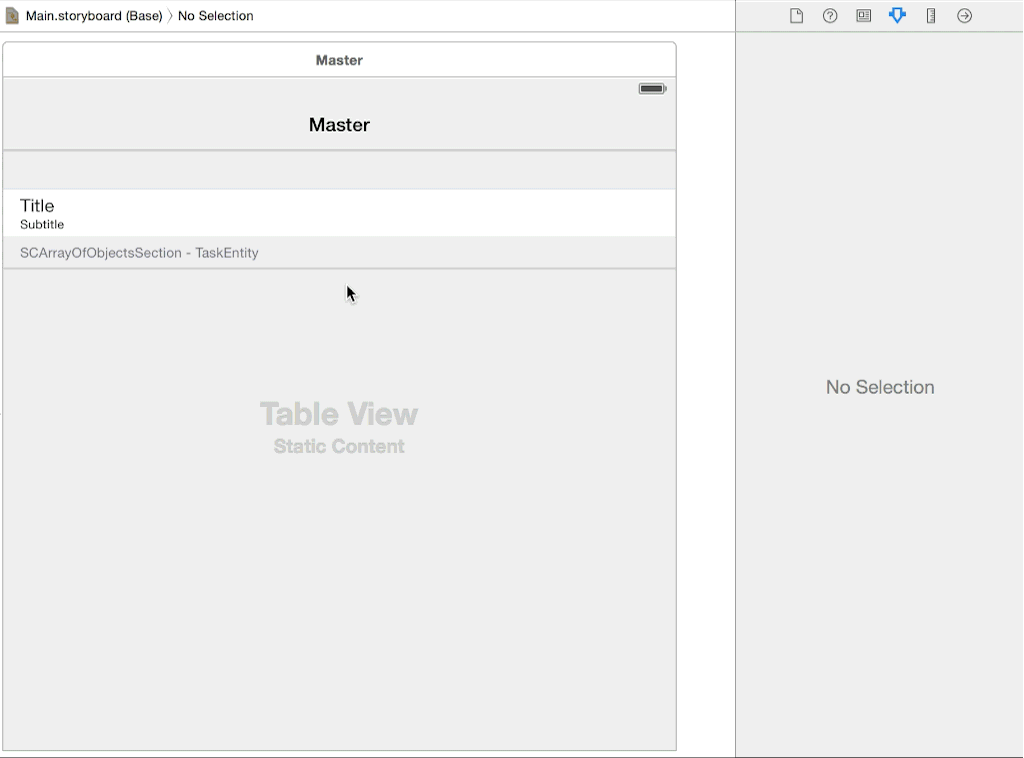
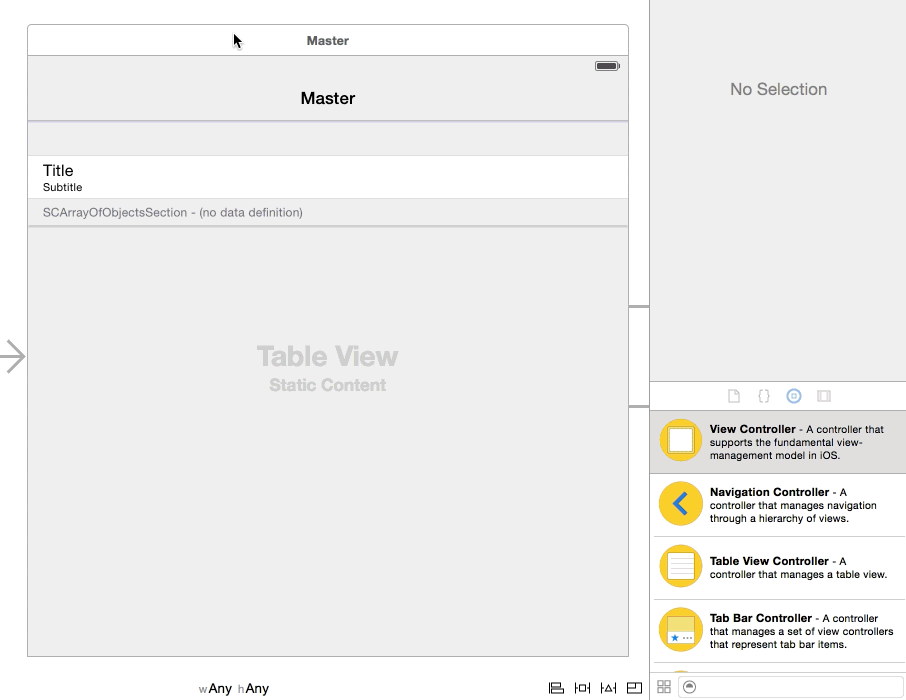
Now connect our configured TasksEntity definition to the SCArrayOfObjectsSection on our view controller by selecting it, then selecting 'TaskEntity' from the 'Data Definition' drop-down. Finally, set the section's placeholder text to '(no tasks)'
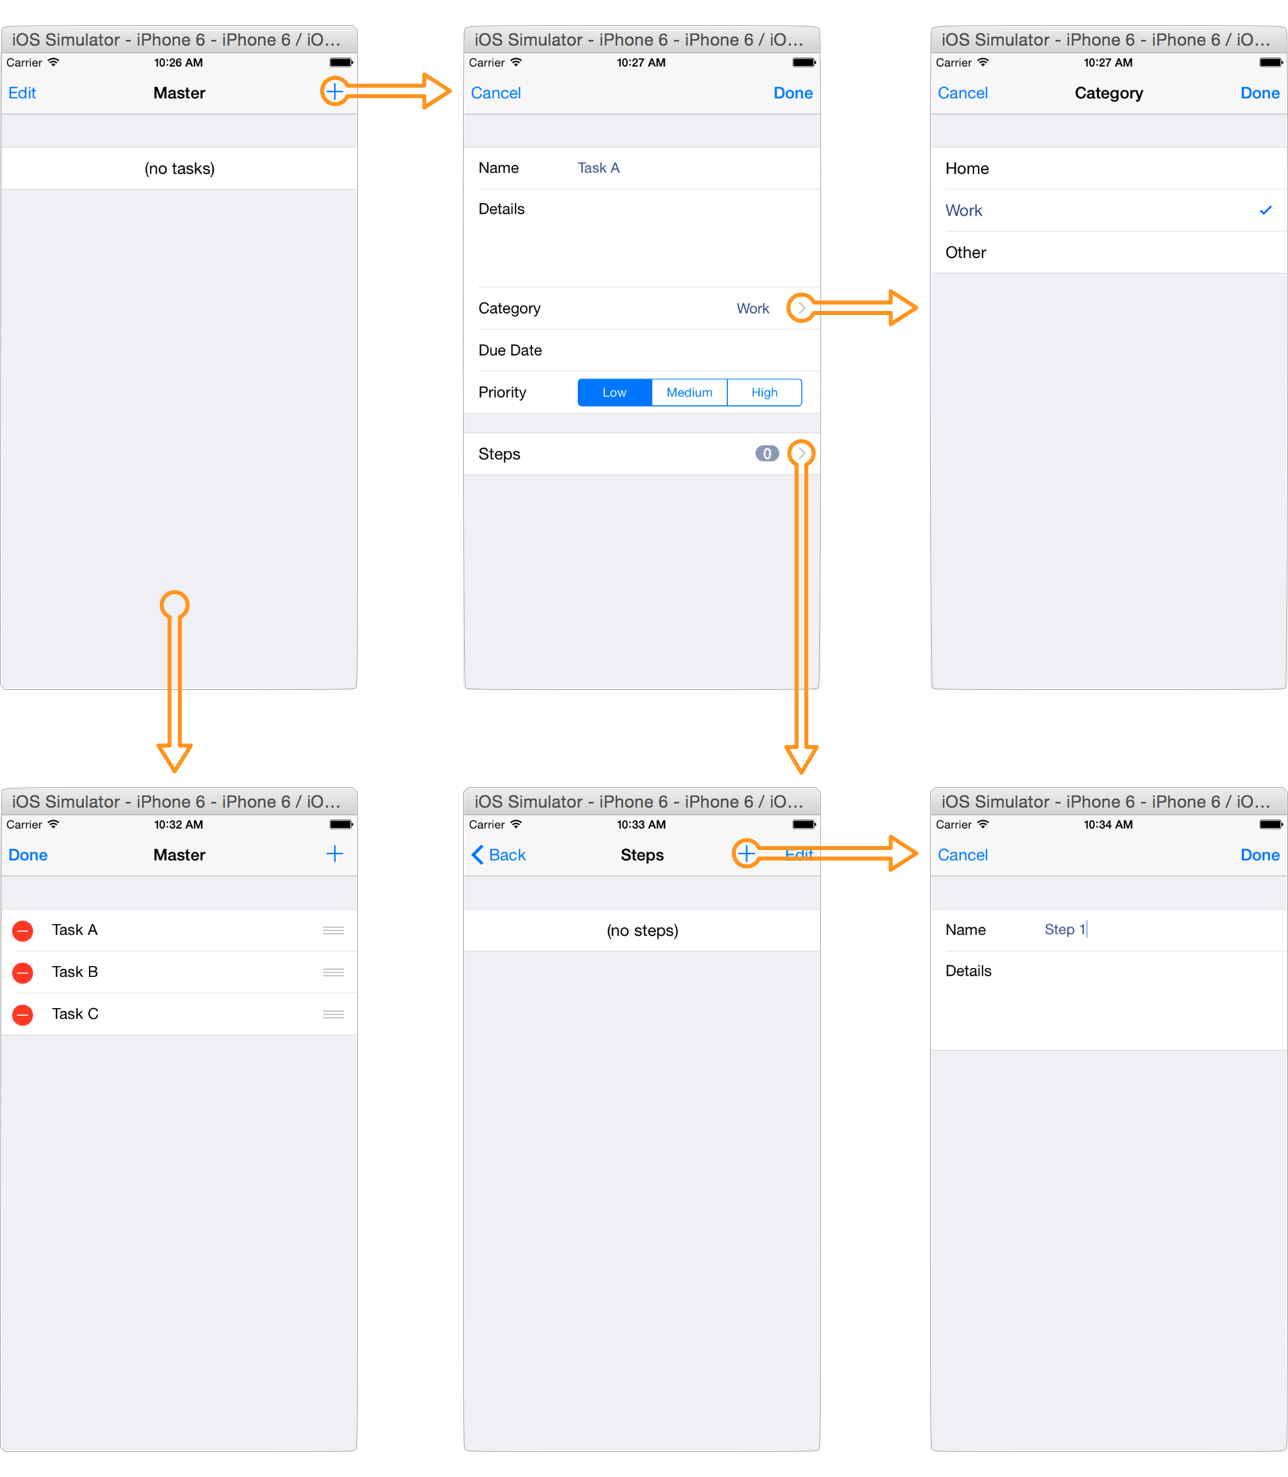
After configuring both the Entity Definitions and our Objects Section, we're now finally ready to play with our little app. Compile and run our app by choosing Product->Run from the menu. If you've correctly followed the previous steps, your the app should look something like this:

Congratulations on your first STV project! Feel free to play around with the app and see how each of the generated UI element is functioning. You can also start fully customizing the UI in Interface Builder by returning to the Storyboard, selecting the SCArrayOfObjectsSection, and clicking the 'Generate Detail Section(s)' button. You can read about this in much more depth in the Customizing STV section.
Exploring Object Binding
In this section we will be implementing the exact same tasks app we developed in Exploring Core Data Binding, except that this time we will be using regular NSObject subclasses instead of Core Data. This option is very useful if you already have an object graph in your application that does not require persistence, or a one that you would like to manually implement persistence for. Similarly to what we saw in Core Data Binding, STV will be able to fully "understand" your object graph, generating a fully customizable UI representing the objects and their relationships.
We will start by launching Xcode and creating a new project. In the Project Templates screen, choose the 'Sensible TableView' category, then choose the 'STV Application' project template. In the next screen, name the project 'TasksApp', and select 'Objective-C' as the project language. Uncheck 'Use Core Data' (if selected) since we won't be using it. Once you're done with creating the project, we'll be creating a 'Task' class and a 'TaskEntity' class to represent our data structures. We will then configure what STV calls a 'Class Definition' in the Storyboard to let STV know how to represent these two classes.
After creating the project, follow these steps to create the classes and configure their class definitions:
- Select File->New->File... from the menu, then select the template called 'Cocoa Touch Class' from the 'Source' template category. Click 'Next', then set the 'Class' field to 'Task', and the 'Subclass of' field to 'NSObject', then finalize creating the file.
- Repeat the previous step with setting the 'Class' field 'TaskStep', and the 'Subclass of' field to 'NSObject' as before.
From the Project Navigator pane, select the file 'Task.h' and paste the following code into it.
@interface Task : NSObject

@property (nonatomic, copy) NSString *name;
@property (nonatomic, copy) NSString *details;
@property (nonatomic, copy) NSString *category;
@property (nonatomic, strong) NSDate *dueDate;
@property (nonatomic) NSInteger priority;

@property (nonatomic, strong) NSMutableArray *taskSteps;  // mutable array of TaskStep objects

@end
Select the file 'TaskStep.h' from the Project Navigator pane and paste the following code into it.
@interface TaskStep : NSObject

@property (nonatomic, copy) NSString *name;
@property (nonatomic, copy) NSString *details;

@end
Move on to the Storyboard by clicking the file 'Main.storyboard' from the Project Navigator. Now follow the exact same Storyboard steps discussed in Exploring Core Data Binding, except that this time we'll drag and drop a 'Class Definition' instead of an 'Entity Definition'. By the time you finish, you should have a Storyboard that looks like this:
We could perfectly run the app now, but we'd like to provide some initial task objects for the app to work with. In your own applications, this would be similar to having an existing object graph and passing it on to STV to display it to the user. To pass objects at runtime to the SCArrayOfObjectsSection we created in Interface Builder, simply implement the 'objectsForSection:atIndex:' method in MasterViewController (the same view controller the section exists in).
Select the file 'MasterViewController.m' and have its code look like this:
#import "MasterViewController.h"

#import "Task.h"
#import "TaskStep.h"

@interface MasterViewController ()

@property NSMutableArray *objects;
@end

@implementation MasterViewController

- (void)viewDidLoad {
    [super viewDidLoad];
    // Do any additional setup after loading the view, typically from a nib.
}

- (void)awakeFromNib
{
    // Initialize self.objects
    Task *taskA = [[Task alloc] init];
    taskA.name = @"Task A";
    taskA.details = @"Just an initial task!";

    self.objects = [NSMutableArray arrayWithObject:taskA];
}

- (NSMutableArray *)objectsForSection:(SCArrayOfObjectsSection *)objectsSection atIndex:(NSUInteger)index
{
    return self.objects; // pass self.objects to the SCArrayOfObjectsSection
}

@end
Congratulations! You should now have a fully working tasks application.
Exploring Dictionary Binding
Using Dictionary Binding, STV can directly access and modify the values of an NSMutableDictionary, while also generating the appropriate UI for each of its keys. This is really useful when your app receives its data externally in a set of dictionaries, or in cases where your data is trivial and creating a special class to hold it is simply an overkill.
Launch Xcode, then select File->New->Project.. to create a new project. In the Project Templates screen, choose the 'Sensible TableView' category, then choose the 'STV Application' project template. In the next screen, name the project 'DictionaryApp', and select 'Objective-C' as the project language. Uncheck 'Use Core Data' (if selected) since we won't be using it. Once you're done with creating the project, we'll be implementing a very simple STV dictionary editor for an NSMutableDictionary with three keys: 'key1', 'key2', 'key3'.
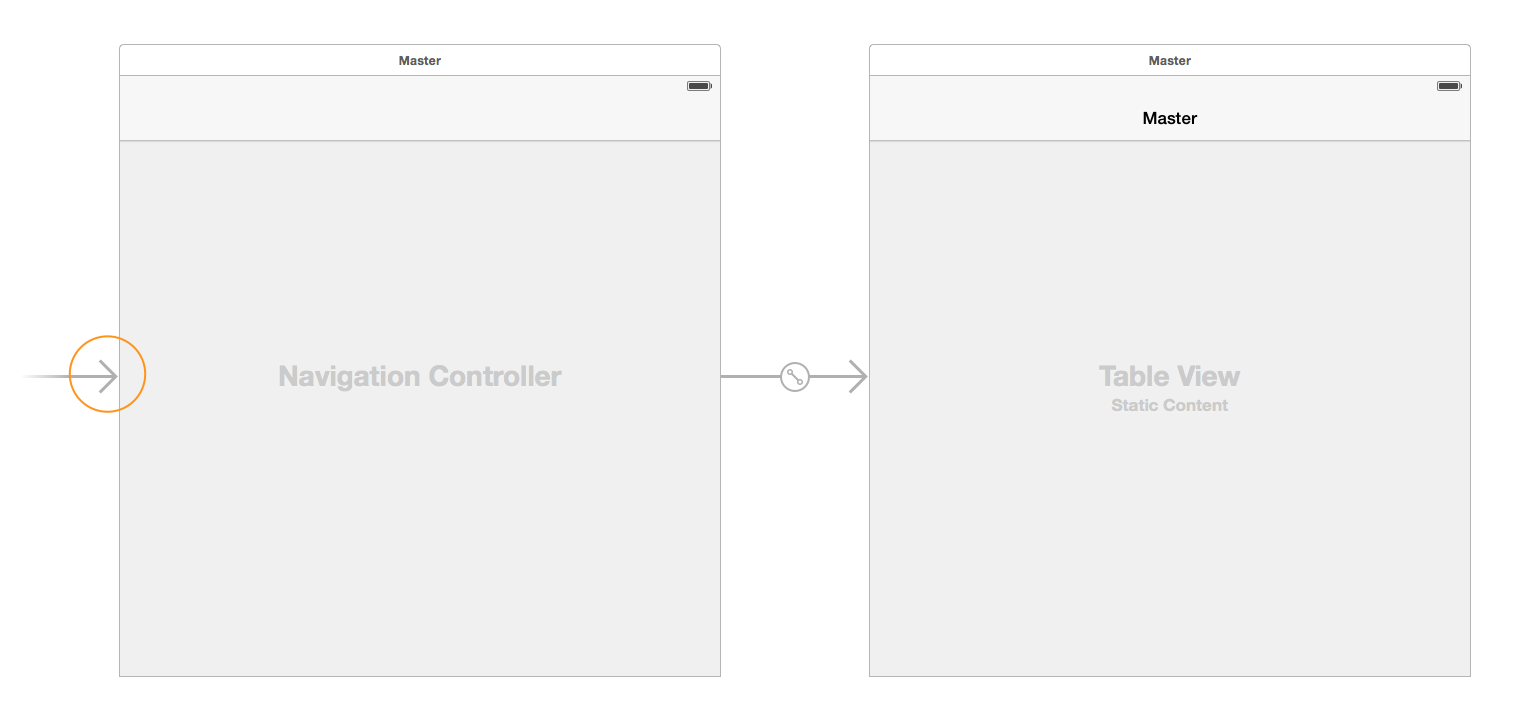
We'll first start by customizing the Storyboard to fit our application needs. Since we'll only have a simple dictionary editor without any detail views, there is actually very little need for the split view controller provided by the template, and we'll be removing that. Also, since we're only interested in displaying a single object (our dictionary), we'll replace the 'SCArrayOfObjectsSection' in our table view with a new 'SCObjectSection' from the Object Library pane. Finally, we'll add a 'Dictionary Definition' to our view controller and configure it, much like we did in Exploring Core Data Binding and Exploring Object Binding.
- Select the file 'Main.storyboard' from the Project Navigator.
- Zoom out, then select the split view controller and delete it by pressing delete.
- Make sure the navigation controller is now the initial view controller for the Storyboard by selecting it and checking the 'Is Initial View Controller' checkbox in Inspector.
- Select the DetailViewController to the right of MasterViewController and delete that too.
Double click on the header of the MasterViewController to select it, then select the 'SCArrayOfObjectsSection' and delete that too. Your Storyboard should now look like this:
- With MasterViewController still active, drag an 'Object Section' from the Object Library pane into it's table view.
- With MasterViewController still active, drag a 'Dictionary Definition' from the Object Library pane into it's header.
With the newly added Dictionary Definition selected, add three keys in Inspector and call them 'key1', 'key2', and 'key3'.
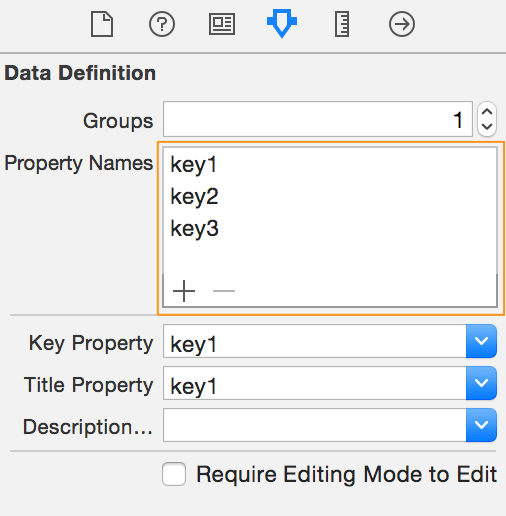
Select 'key1' from the Document Outline, then from the Inspector pane, set its 'Type' to 'Text Field' and its 'Placeholder' to 'enter text'. Do the same to 'key2' and 'key3', setting their types to 'Slider' and 'Switch', respectively.

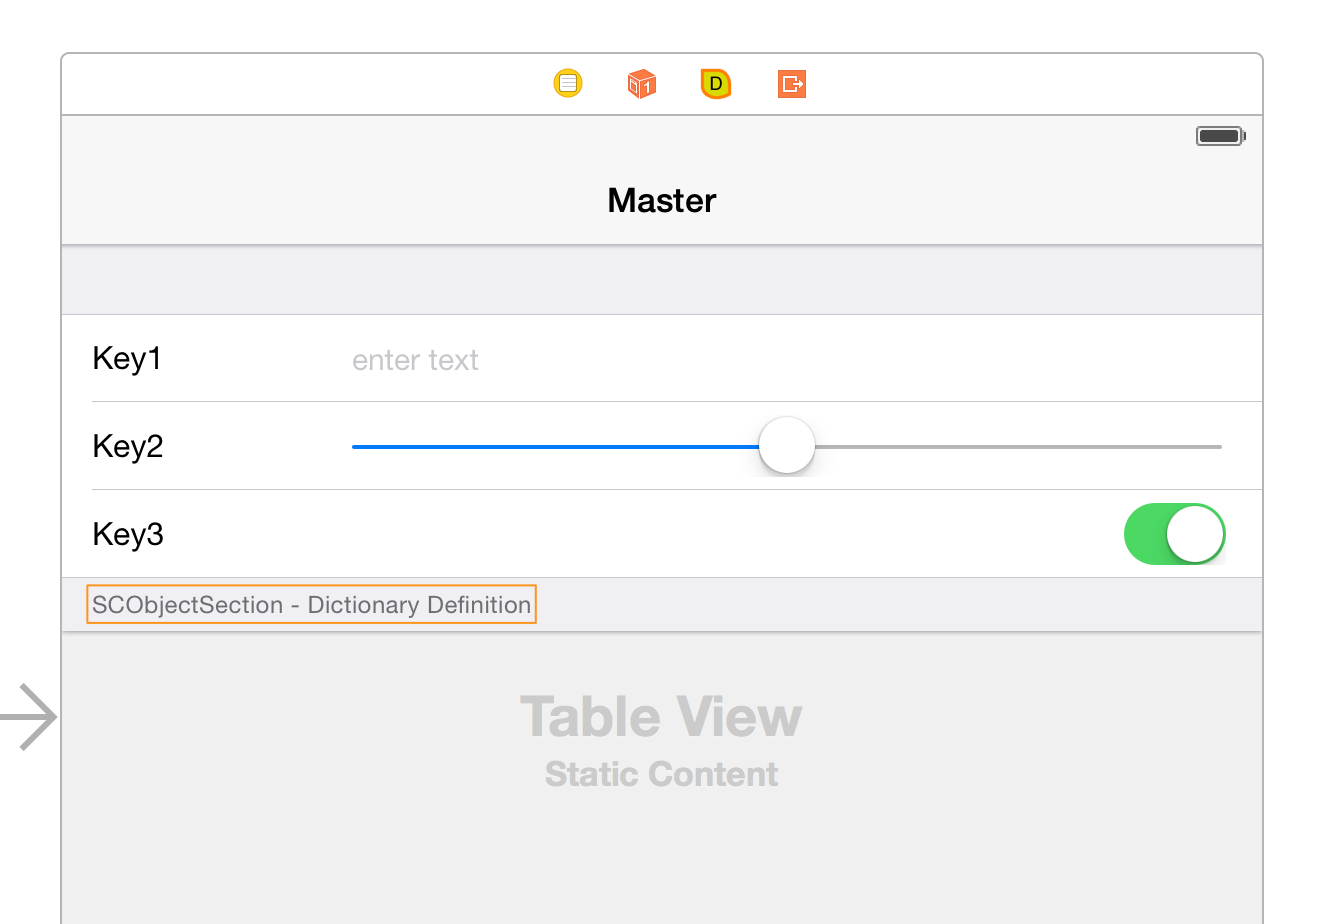
Select the SCObjectSection you dragged earlier, and assign 'Dictionary Definition' for its 'Data Definition' drop-down in the Inspector pane. If you wish to see how the generated cells will look like, while the section is still selected, simply click the 'Generate Cells' button (not a required step). The generated cells are tied live with whatever changes you do to the Dictionary Definition.
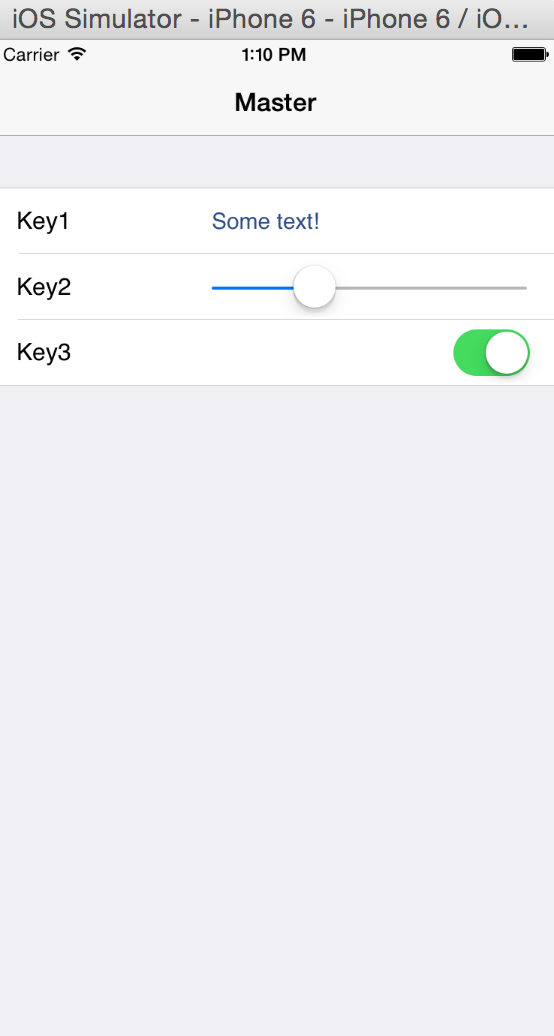
Finally, we need to pass on the NSMutableDictionary we'd like to edit to STV at runtime so that it would bind the controls to it. Select the file 'MasterViewController.m and have its code look like this:
@interface MasterViewController ()

@property NSMutableDictionary *dictionary;
@end

@implementation MasterViewController

- (void)viewDidLoad {
    [super viewDidLoad];
    // Do any additional setup after loading the view, typically from a nib.
}

- (void)awakeFromNib
{
    self.dictionary = [NSMutableDictionary dictionary];
    [self.dictionary setValue:@"Some text!" forKey:@"key1"]; // value for text field
    [self.dictionary setValue:[NSNumber numberWithFloat:0.3] forKey:@"key2"]; // value for slider
    [self.dictionary setValue:[NSNumber numberWithBool:YES] forKey:@"key3"]; // value for switch
}

- (NSObject *)objectForSection:(SCObjectSection *)objectSection atIndex:(NSUInteger)index
{
    return self.dictionary; // pass self.dictionary to the SCObjectSection
}

@end
Now run the app and you should see our simple dictionary editor in action!
Exploring Web Service Binding
Web Service Binding gives STV the ability to magically bind to and consume web services, very much the same way it binds to Core Data and regular NSObjects. In this section, we'll explore this by creating an app that communicates with the Youtube API to search for videos matching a specific search term.
We will start by launching Xcode and creating a new project. In the Project Templates screen, choose the 'Sensible TableView' category, then choose the 'STV Web Services' project template. In the next screen, name the project 'WebServiceApp', and select 'Objective-C' as the project language. Uncheck 'Use Core Data' (if selected) since we won't be using it. Now finalize creating the project, and follow the next steps to create and configure a Web Service Definition that is able to properly communicate with Youtube.
- Select the file 'Main.storyboard' from the Project Navigator.
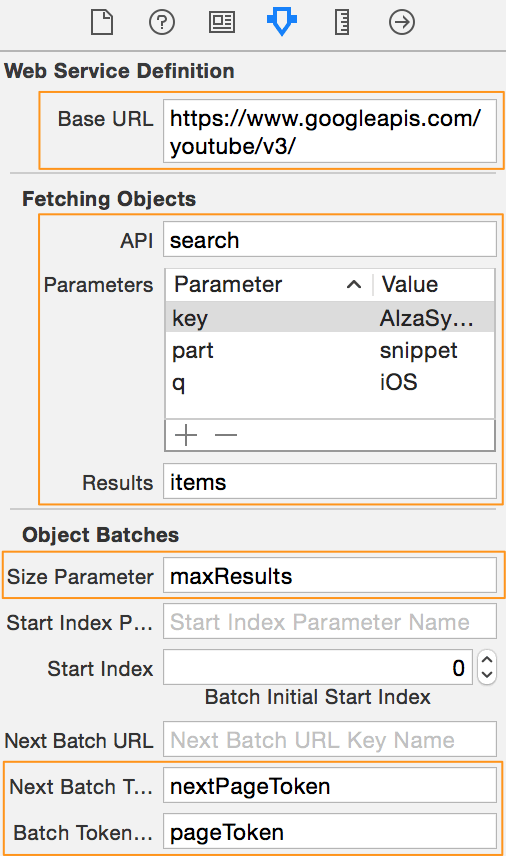
- Make sure MasterViewControler is selected by double-clicking on its header, then drag and drop a 'Web Service Definition' from the Object Library pane onto the view controller.
- With the dropped Web Service Definition selected, enter https://www.googleapis.com/youtube/v3/ in the 'Base URL' Inspector field.
- Enter search in the 'API' field.
- Enter the following in the 'Parameters' list:
- key -> AIzaSyBn89DQEUpEDQjr5BzSZCS30hQGNfG_eEIThis Youtube API key belongs to Sensible Cocoa, but feel free to use it in your test apps. For production code however, you will need to get your own API key by registering your application with Youtube.
- part -> snippet (as per search documentation)
- q -> iOS (this is the search query)
- key -> AIzaSyBn89DQEUpEDQjr5BzSZCS30hQGNfG_eEI
- Enter items in the 'Results' field.
- Enter maxResults in the 'Batch Size Parameter Name' field.
- Enter nextPageToken in the 'Next Batch Token Key Name' field.
Enter pageToken in the 'Batch Token Parameter Name' field.
- Scroll all the way down in Inspector and enter snippet.title in the 'Title Property' field. This tells STV to use the value of this key as the cell's main title.
Enter snippet.description in the 'Description Property' field. This tells STV to use the value of this key as the cell's detail title.
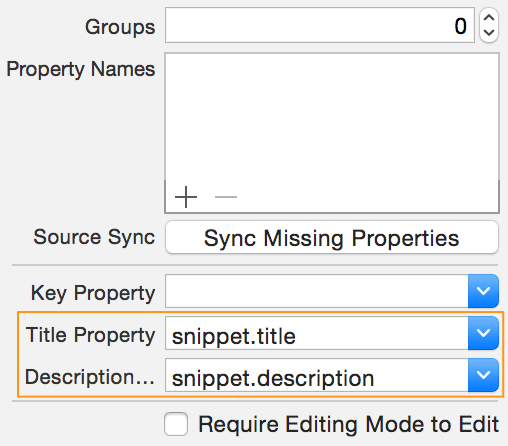 Notice that this time we haven't added any Property Definitions to the Web Service Definition. This is because in this app, we don't need to generate detail view UI for each of our Youtube video cells.
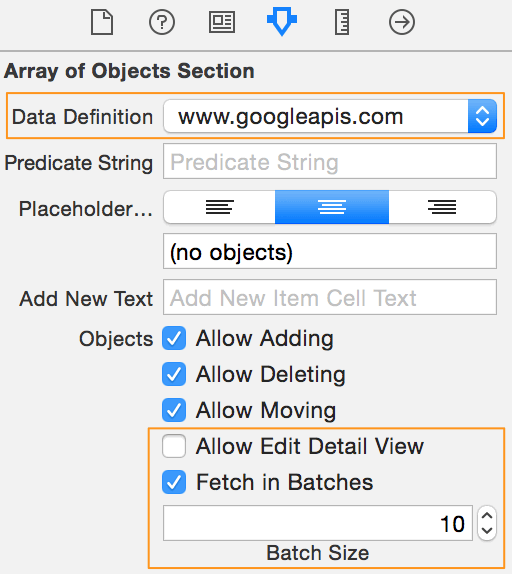
Now that we have fully configured our Web Service Definition, go ahead and connect it to MasterViewController's SCArrayOfObjectsSection by selecting the section and selecting 'www.googleapis.com' (the auto-generated name for our Web Service Definition) in the 'Data Definition' drop-down. Next, uncheck the 'Allow Edit Detail View' checkbox since we don't want to generate cell detail views. Finally, specify the number of videos fetched per each batch by checking the 'Fetch in Batches' checkbox (we'll leave the 'Batch Size' at 10).
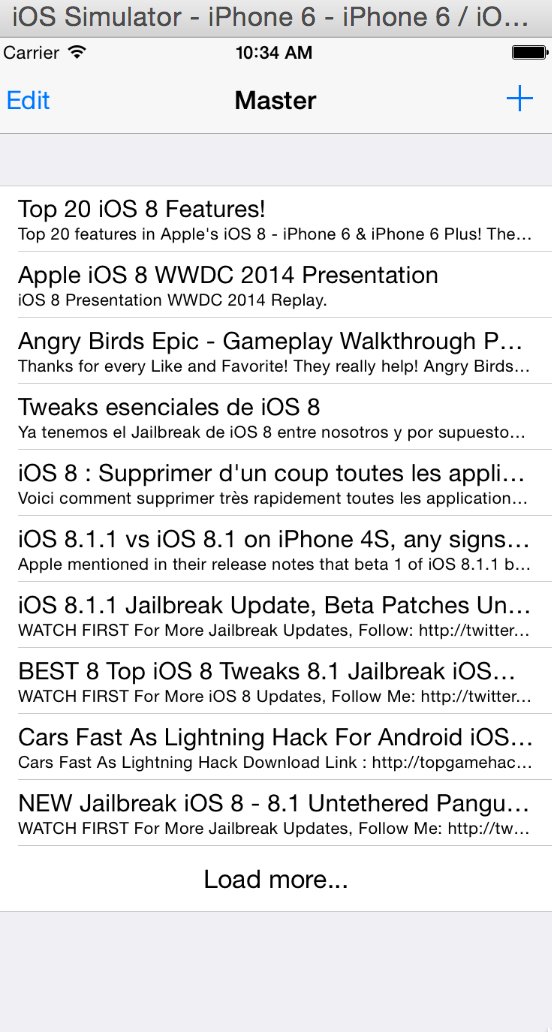
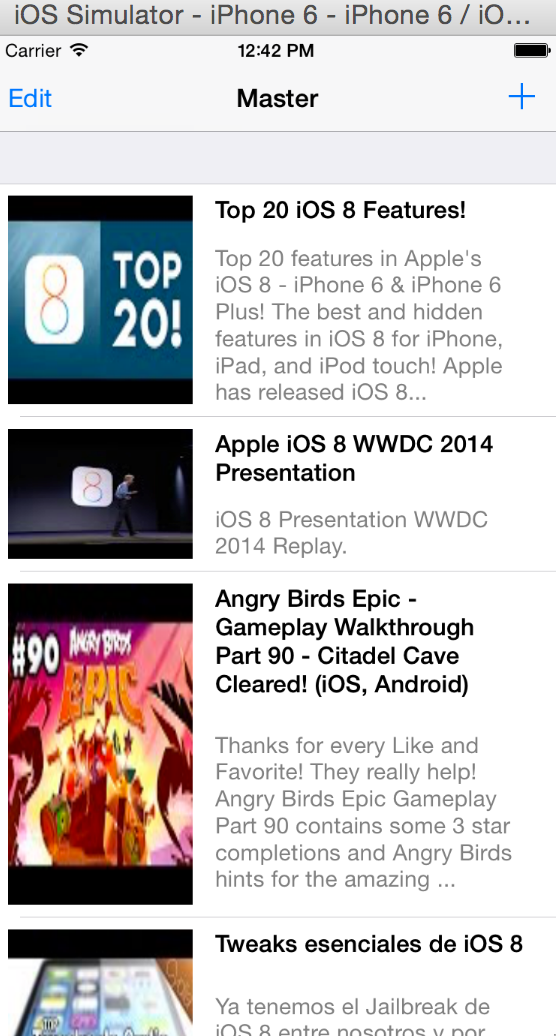
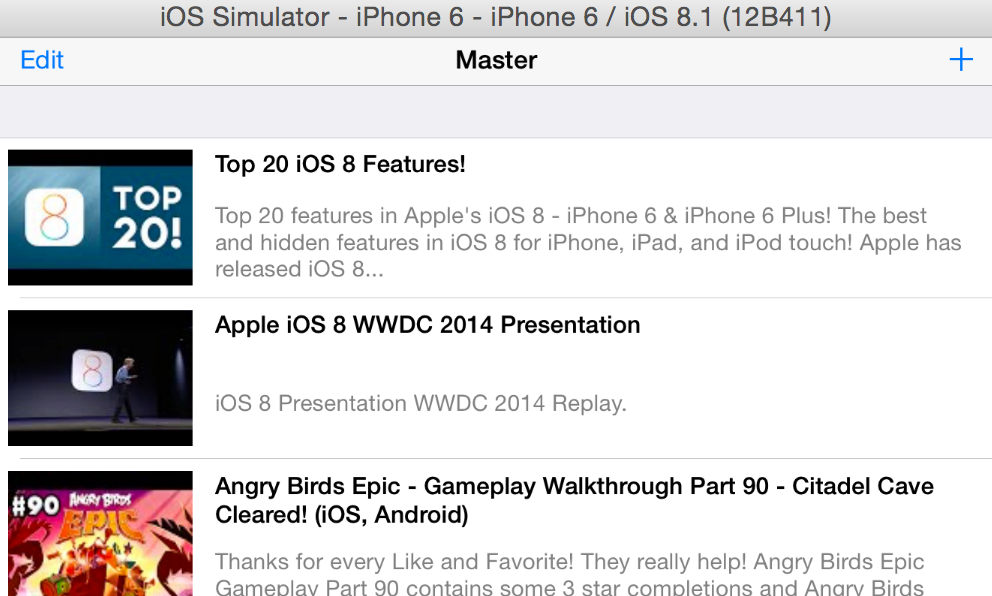
Now go ahead and run the app. You should see a list of Youtube videos matching our 'iOS' search term, plus a 'Load More...' cell that loads the next batch of 10 videos when tapped.
This is not bad at all for our first iteration, but we'd like to see the full video description, plus an image preview of the video, and have all the cells automatically resize to fit their contents. This is where we'll make use of STV's awesome custom cells feature. Follow the next steps to create our custom cell:
- Return back to your Storyboard and select the cell inside your SCArrayOfObjectsSection (make sure you have the cell itself selected and not its contentView).This cell is representative of all the cells generated by the SCArrayOfObjectsSection. Customizing this cell in turn customizes all the other generated cells.
- From the Inspector pane, set the cell style to 'Custom' instead of 'Subtitle'. This allows us to drag our own custom controls to the cell.
From the Object Library pane, drag an Image View and two UILabels, which we'll use to display the video thumbnail, title and description. Arrange the controls so that the image view is on the right, and the title and description labels are under each other (you might want to stretch the height of the cell to make it more convenient to manage the controls). Next, select both UILabels and set their 'Lines' to 0 and 'Line Breaks' to Word Wrap (0 lines makes STV resize the labels indefinitely, or you could alternatively specify the max number of lines you want the labels to resize to). Now add Auto Layout constraints to correctly pin the image and autoresize the labels as the cell grows.
It is really important that there are proper constraints along the full height of the cell so that STV could correctly resize it. If you're not sure how to do that, it's highly recommended that you watch our Cell Auto-Resizing Video.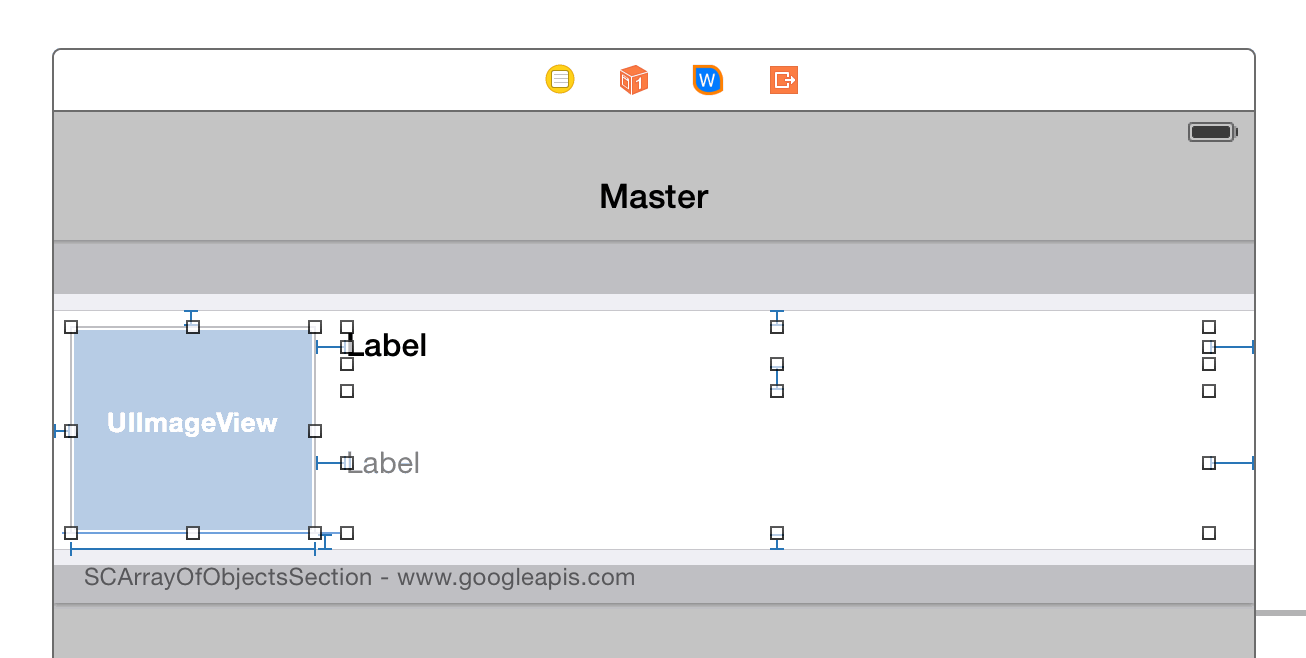
- To have STV automatically assign the video title to the correct label, select your title label and assign its 'Text' from Inspector to {snippet.title}. This is called Curly Brace Binding, and it makes it super convenient to have STV bind controls to their respective object properties by simply placing the property name between braces.
Similarly, select your description label and assign its 'Text' to {snippet.description}.
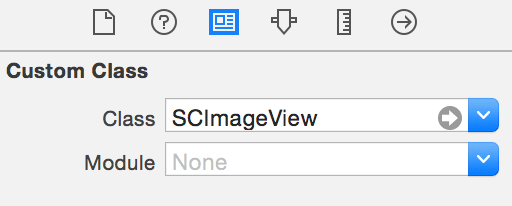
Lastly, our image view also needs to be bound to its respective property name. Since UIImageView does not have any Inspector field suitable for us to write the bound property name into, STV introduced a new class called SCImageView for us to be able to do that. To use the SCImageView class for our image view, select the image view, then enter SCImageView for the 'Class' field in the Identity Inspector.
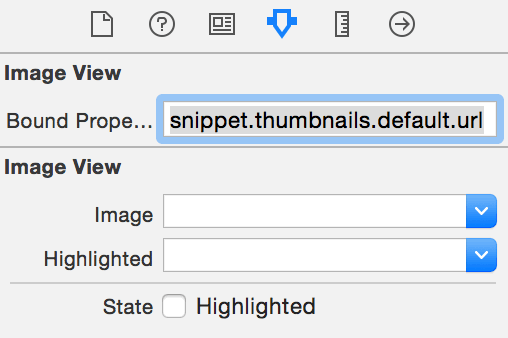
Now go back to the Attributes Inspector and you should find that a new field called 'Bound Property Name' has appeared. Enter the value snippet.thumbnails.default.url into the new field.
Exploring Parse.com Binding
In this section we'll explore how STV integrates with Facebook's popular Parse framework to provide unprecedented simplicity to your cloud based application development. With Parse handling all the server-side business logic, and STV handling all the UI and user data syncing, it's incredible how you can now develop complex cloud applications in just a matter of minutes!
Using Parse and STV, we'll be creating the exact same tasks app we developed in Exploring Core Data Binding, except that this time it will have a cloud backend to store all the user data and have it accessible from multiple devices and locations. We'll first start by creating our 'Task' and 'TaskStep' classes on the Parse backend:
- If you don't already have a Parse account, go ahead and create one at http://parse.com.
- Login to your account, then create a new application called 'Tasks App'.
- Add two classes to your application, 'Task' and 'TaskStep'.
- Select the 'Task' class and add the following columns: name (String), details (String), category (String), dueDate (Date), priority (Number), taskSteps (Relationship - Target Class: TaskStep).
- Select the 'TaskStep' class and add the following columns: name (String), details (String).
Next, launch Xcode and create a new project. In the Project Templates screen, choose the 'Sensible TableView' category, then choose the 'STV Parse Application' project template. In the next screen, name the project 'ParseApp', and select 'Objective-C' as the project language. Uncheck 'Use Core Data' (if selected) since we won't be using it. Once you're done with creating the project, we will then create and configure what STV calls a 'Parse Definition' in the Storyboard, to let STV know how to communicate with and present your Parse classes.
- Navigate to the Storyboard by clicking the file 'Main.storyboard' in the Project Navigator.
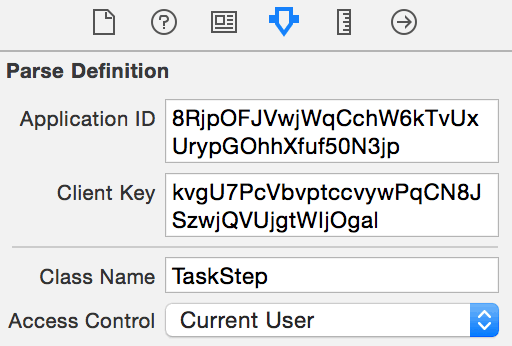
- Make sure MasterViewControler is selected by double-clicking on its header, then drag and drop a 'Parse Definition' from the Object Library pane onto the view controller.
- With the dropped Parse Definition selected, enter the application ID you got from Parse into the 'Application ID' field in Inspector.
- Enter TaskStep in the 'Class Name' field.
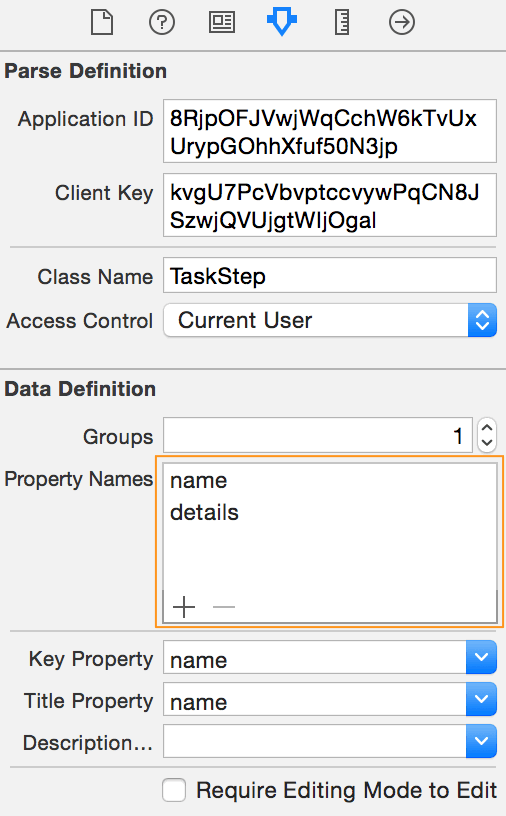
Make sure the 'Access Control' drop-down has the value Current User. This means that any objects entered will be owned (and only be accessible by) the currently logged in user.
In the 'Property Names' list in Inspector, enter the two columns you created at the Parse backend: 'name' and 'details'.
 At this stage we had hoped to make STV go ahead and fetch all the Parse class columns automatically instead of you having to enter them manually, just as it does with Core Data and regular NSObjects. We contacted Parse to see if they had any APIs to make us able to access the meta information for their classes, and they said they're working on it. Until the time of this writing, we are yet to hear from Parse regarding these APIs.
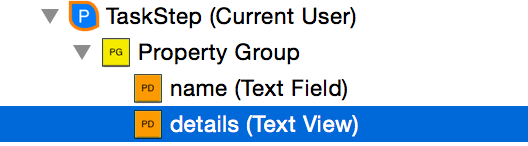
- Select the 'name' Property Definition from the Document Outline, then set its type to 'Text Field' in Inspector. Also check the 'Required' checkbox to make STV enforce that it always has a value.
Select the 'details' Property Definition from the Document Outline, then set its type to 'Text View' in Inspector.
- Now double-click the header of MasterViewController again to select it, then drag and drop another Parse Definition into it.
- With the new Parse Definition selected, enter the 'Application ID' and 'Client Key' as before, and set 'Class Name' to Task.
- Go ahead and enter all the Task columns in the 'Property Names' list as we did before in TaskStep, then configure the generated Property Definitions as follows:
- Set the type for 'name' to 'Text Field' in Inspector, then check the 'Required' checkbox.
- Set the type for 'details' to 'Text View'.
- Set the type for 'category' to 'Selection', and enter the following selection items: 'Home', 'Work', and 'Other'.
- Set the type for 'dueDate' to 'Date'.
- Set the type for 'priority' to 'Segmented', then similar to what we did with 'category', add three segment names: 'Low', 'Medium', and 'High'.
- Set the type for 'taskSteps' to 'Array of Objects', then select 'TaskStep' from it's 'Data Definition' drop-down to let STV know the connection between the Task and TaskStep. Next, set its 'Placeholder Cell Text' field to '(no steps)'.
When you're done, your Document Outline should look like this:
Now that we have fully configured our Parse Definition, go ahead and connect it to MasterViewController's SCArrayOfObjectsSection by selecting the section and selecting 'Task' in the section's 'Data Definition' drop-down. With SCArrayOfObjectsSection still selected, set its placeholder to '(no tasks)'.
We're now almost done, with the last remaining piece in our app being the user authentication and sign-up code. In this sample app, we'll be using Parse's own 'PFLogInViewController' and 'PFSignUpViewController' code for this, so select the file 'MasterViewController.m' from the Project Navigator and make sure its code looks like this:
#import "MasterViewController.h"

@interface MasterViewController () <PFLogInViewControllerDelegate, PFSignUpViewControllerDelegate>

@end


@implementation MasterViewController

- (void)viewDidLoad {
    [super viewDidLoad];
    // Do any additional setup after loading the view, typically from a nib.
}

- (void)viewDidAppear:(BOOL)animated {
    [super viewDidAppear:animated];

    if (![PFUser currentUser]) { // No user logged in
        // Create the log in view controller
        PFLogInViewController *logInViewController = [[PFLogInViewController alloc] init];
        [logInViewController setDelegate:self]; // Set ourselves as the delegate

        // Create the sign up view controller
        PFSignUpViewController *signUpViewController = [[PFSignUpViewController alloc] init];
        [signUpViewController setDelegate:self]; // Set ourselves as the delegate

        // Assign our sign up controller to be displayed from the login controller
        [logInViewController setSignUpController:signUpViewController];

        // Present the log in view controller
        [self presentViewController:logInViewController animated:YES completion:nil];
    }

}

#pragma mark - PFLogInViewControllerDelegate

// Sent to the delegate to determine whether the log in request should be submitted to the server.
- (BOOL)logInViewController:(PFLogInViewController *)logInController shouldBeginLogInWithUsername:(NSString *)username password:(NSString *)password {
    // Check if both fields are completed
    if (username && password && username.length && password.length) {
        return YES; // Begin login process
    }

    [[[UIAlertView alloc] initWithTitle:NSLocalizedString(@"Missing Information", nil) message:NSLocalizedString(@"Make sure you fill out all of the information!", nil) delegate:nil cancelButtonTitle:NSLocalizedString(@"OK", nil) otherButtonTitles:nil] show];
    return NO; // Interrupt login process
}

// Sent to the delegate when a PFUser is logged in.
- (void)logInViewController:(PFLogInViewController *)logInController didLogInUser:(PFUser *)user {
    [self dismissViewControllerAnimated:YES completion:nil];
}

// Sent to the delegate when the log in attempt fails.
- (void)logInViewController:(PFLogInViewController *)logInController didFailToLogInWithError:(NSError *)error {
    NSLog(@"Failed to log in...");
}

// Sent to the delegate when the log in screen is dismissed.
- (void)logInViewControllerDidCancelLogIn:(PFLogInViewController *)logInController {
    NSLog(@"User dismissed the logInViewController");
}

#pragma mark - PFSignUpViewControllerDelegate

// Sent to the delegate to determine whether the sign up request should be submitted to the server.
- (BOOL)signUpViewController:(PFSignUpViewController *)signUpController shouldBeginSignUp:(NSDictionary *)info {
    BOOL informationComplete = YES;

    // loop through all of the submitted data
    for (id key in info) {
        NSString *field = [info objectForKey:key];
        if (!field || !field.length) { // check completion
            informationComplete = NO;
            break;
        }
    }

    // Display an alert if a field wasn't completed
    if (!informationComplete) {
        [[[UIAlertView alloc] initWithTitle:NSLocalizedString(@"Missing Information", nil) message:NSLocalizedString(@"Make sure you fill out all of the information!", nil) delegate:nil cancelButtonTitle:NSLocalizedString(@"OK", nil) otherButtonTitles:nil] show];
    }

    return informationComplete;
}

// Sent to the delegate when a PFUser is signed up.
- (void)signUpViewController:(PFSignUpViewController *)signUpController didSignUpUser:(PFUser *)user {
    [self dismissViewControllerAnimated:YES completion:NULL];
}

// Sent to the delegate when the sign up attempt fails.
- (void)signUpViewController:(PFSignUpViewController *)signUpController didFailToSignUpWithError:(NSError *)error {
    NSLog(@"Failed to sign up...");
}

// Sent to the delegate when the sign up screen is dismissed.
- (void)signUpViewControllerDidCancelSignUp:(PFSignUpViewController *)signUpController {
    NSLog(@"User dismissed the signUpViewController");
}

@end
That's it! You can now go ahead and run the app. If you've done everything correctly, each signed in user will be able to add their own tasks and task steps exactly as they did in the Core Data sample, except that the backend this time is the Parse cloud server (accessible from anywhere) instead of a local SQLite database (accessible only from the user's device). To make sure everything is working properly, do some changes to the tasks in the app, then go view them on the Parse backend. You should find that the changes are synced almost instantaneously.
Exploring User Defaults Binding
STV's User Defaults Binding makes the usually mundane task of creating the UI for taking user input and saving it back and forth to NSUserDefaults an extremely simple and trivial task. It's just as simple as dropping in what STV calls a 'User Defaults Definition', specifying the required fields there, and connecting it back to an SCObjectSection!
To start, launch Xcode, then select File->New->Project.. to create a new project. In the Project Templates screen, choose the 'Sensible TableView' category, then choose the 'STV Application' project template. In the next screen, name the project 'UserDefaultsApp', and select 'Objective-C' as the project language. Uncheck 'Use Core Data' (if selected) since we won't be using it. Once you're done with creating the project, we'll be implementing a very simple user settings form with some username, password, and some alarm ringtone settings.
We'll first start by customizing the Storyboard to fit our application needs. Since we'll only have a simple single page form, there is actually very little need for the split view controller provided by the template, and we'll be removing that. Also, we'll be replacing the 'SCArrayOfObjectsSection' in our table view with a new 'SCObjectSection' from the Object Library pane. Finally, we'll add a 'User Defaults Definition' to our view controller and configure it, much like we did in Exploring Core Data Binding and Exploring Object Binding.
- Select the file 'Main.storyboard' from the Project Navigator.
- Zoom out, then select the split view controller and delete it by pressing delete.
- Make sure the navigation controller is now the initial view controller for the Storyboard by selecting it and checking the 'Is Initial View Controller' checkbox in Inspector.
- Select the DetailViewController to the right of MasterViewController and delete that too.
Double click on the header of the MasterViewController to select it, then select the 'SCArrayOfObjectsSection' and delete that too. Your Storyboard should now look like this:
- With MasterViewController still active, drag an 'Object Section' from the Object Library pane into it's table view.
- With MasterViewController still active, drag a 'User Defaults Definition' from the Object Library pane into it's header.
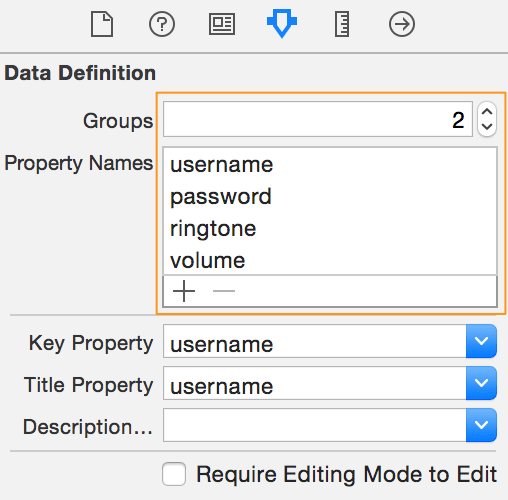
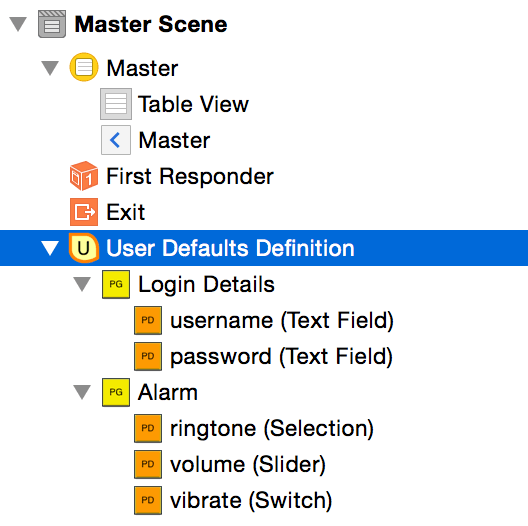
With the newly added User Defaults Definition selected, set the number of 'Groups' to 2 in Inspector, then add the following keys in the 'Property Names' list: 'username', 'password', 'ringtone', 'volume', and 'vibrate'.
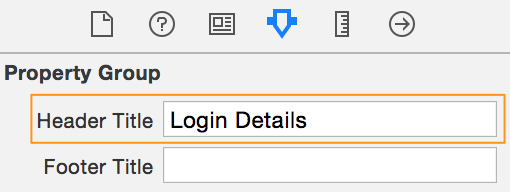
Select the definition's first 'Property Group' from the document outline, then set its 'Header Title' field from Inspector to 'Login Details'.
- Similarly, select the second property group and set it's 'Header Title' to 'Alarm'. From the document outline, move 'ringtone', 'volume' and 'vibrate' into the 'Alarm' group.
- Select 'username' from the Document Outline, then from the Inspector pane, set its 'Type' to 'Text Field' and its 'Placeholder' to 'enter username'. Next, select 'password' and set its type to 'Text Field' too, but make sure to also check its 'Secure' checkbox.
Select 'ringtone' and set its type to 'Selection', then enter the following items into its 'Selection' list: 'Ring A', 'Ring B', 'Ring C'. Next, select 'volume' and set its type to 'Slider', then select 'vibrate' and set its type to 'Switch'.
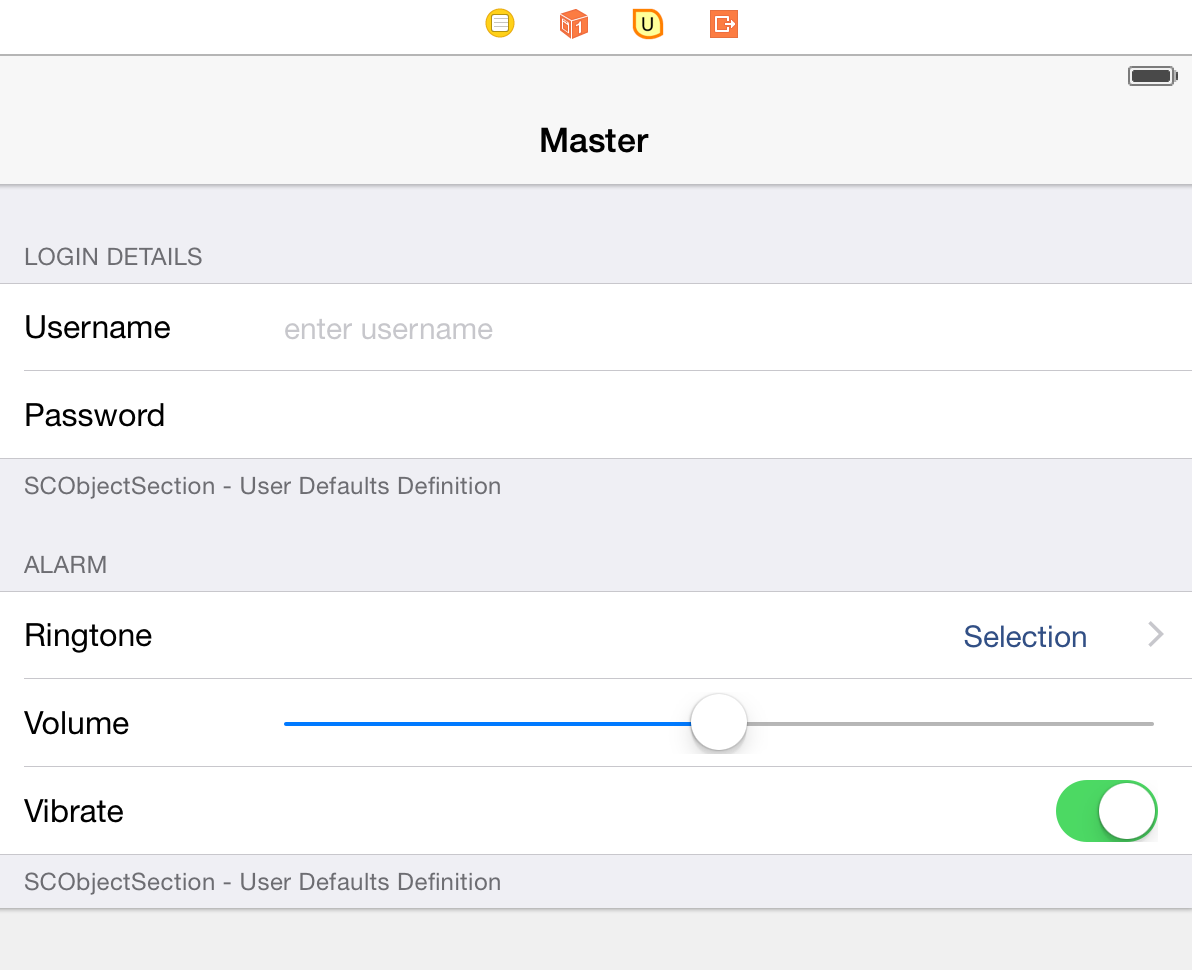
Select the SCObjectSection you dragged earlier, and assign 'User Defaults Definition' for its 'Data Definition' drop-down in the Inspector pane (notice how it automatically selects 'Login Details' in its 'Property Group' field as soon as you do that). If you wish to see how the generated cells will look like, while the section is still selected, simply click the 'Generate Cells' button (not a required step). Since each SCObjectSection can only display one property group, drag and drop a new SCObjectSection from the Library Pane, select its data definition as before, then this time set its 'Property Group' field to 'Alarm'.
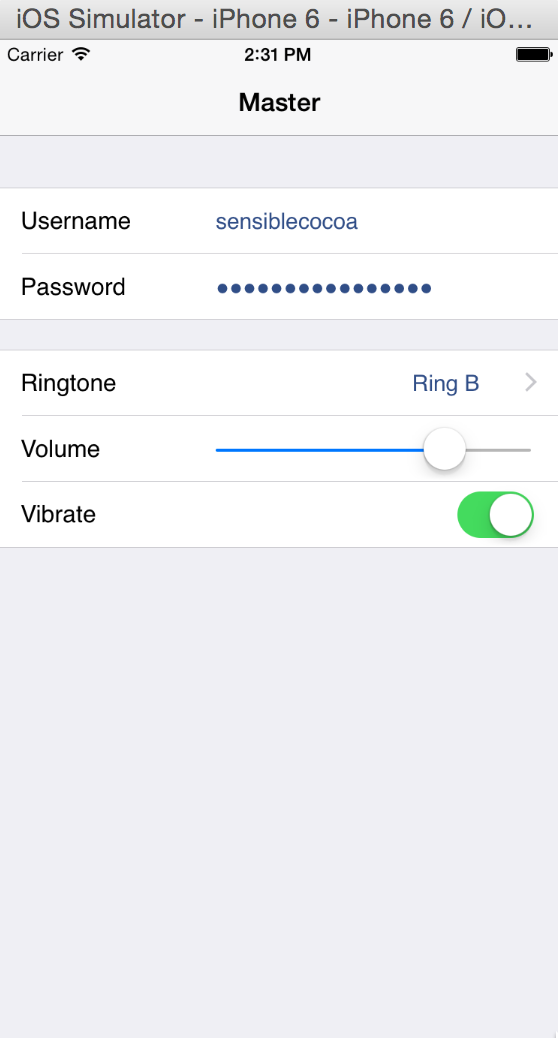
Finally, run the app and enter some values. Notice how the values are automatically persisted to NSUserDefaults as you exit and return back to the app, while still being accessible throughout the app just as any other NSUserDefaults values. Awesome!
Exploring iCloud Binding
STV's 'iCloud Binding' enables you to automatically generate the required UI to take user settings, then automatically manage fetching from and saving to the user's iCloud Key-Value Store.
In this section, we'll be creating a settings page identical to the one we created in Exploring User Defaults Binding. To do that, simply follow the identical steps mentioned there, with the exception of creating an 'STV iCloud Application' instead of an 'STV Application' from the project template, and using an 'iCloud Key-Value Definition' instead of a 'User Defaults Definition'. You'll also need to select your project target and enable iCloud Key-Value Storage in the 'Capabilities' tab. That's it, it's really all that simple to use iCloud storage with STV!
Understanding STV
General Overview
To be able to conceive all the magic you've experienced in the Getting Started section, STV has introduced several core concepts that aim at greatly enhancing your development experience. For instance, you've already been briefly introduced to the concept of data definitions, and how STV uses them to gain further understanding of your data structures. You've also been introduced to the array of objects section element, which you used to effortlessly render any collection of objects.
Each of these concepts or elements has a representation in the form of a special STV framework class. For example, the entity definition you used in Exploring Core Data Binding is represented by the SCEntityDefinition class (the SC prefix is always used to denote the 'Sensible Cocoa' namespace). The array of objects section you dropped in most examples is represented by the SCArrayOfObjectsSection class. As a matter of fact, every single IB element you've worked with in the samples is converted to its STV framework counterpart object at runtime, enabling you to fully access/edit everything you've created right in code. Furthermore, everything you've created visually in IB can also be created at runtime using only code.
In this section, you'll be introduced to all these STV framework elements in a lot more detail.
STV Table View Controller
An STV table view controller is represented by the SCTableViewController class, which is a direct descendant of UITableViewController. As you've probably noted while following our Getting Started examples, STV's view controller is what houses all the different STV IB elements that you drop onto the canvas. If you check the MasterViewController file in any of the samples, you will indeed find that MasterViewController inherits from SCTableVeiwController. In addition to housing all the IB elements, the SCTableViewController also contains the table view model that manages the view controller's UITableView.
Since SCTableViewController is what contains all your IB elements, it's typically what you use to access all of these elements at runtime. For instance, to access the TaskEntity entity definition you visually added to the CoreDataApp sample, you would code the following into MasterViewController's viewDidLoad method:
- (void)viewDidLoad {
    [super viewDidLoad];

    SCEntityDefinition *taskEntityDef = (SCEntityDefinition *)[self dataDefinitionWithIBName:@"TaskEntity"];
}
override func viewDidLoad() {
super.viewDidLoad()
let taskEntityDef = self.dataDefinitionWithIBName("TaskEntity") as! SCEntityDefinition
}Similarly, to access the SCArrayOfObjectsSection you dropped on the canvas:
- (void)viewDidLoad {
    [super viewDidLoad];

    SCArrayOfObjectsSection *objectsSection = (SCArrayOfObjectsSection *)[self.tableViewModel sectionAtIndex:0];
}
override func viewDidLoad() {
super.viewDidLoad()
let objectsSection = self.tableViewModel.sectionAtIndex(0) as! SCArrayOfObjectsSection
}SCTableViewController also has several convenience features, such as automatically setting the navigation bar buttons via its navigationBarType property:
STV Table View Model
The table view model is what brings everything to life by acting as the datasource and delegate for the UITableView control on the view controller, providing it with all its sections, cells, and a lot of other functionality. A model also monitors all events that occur on the UITableView and reports them back to the STV framework. Most events are automatically handled by the framework on your behalf, such as when a cell is moved or deleted. You are still able however to intercept most events and include your own custom logic by using STV’s Actions feature. For example, you can implement the ‘willDisplay‘ cell action to get notified when a cell is displayed, or the ‘didSelect’ action to take custom action when the cell is selected.
A basic table view model is represented by the SCTableViewModel class. In its simplest form, an SCTableViewModel is a collection of SCTableViewSection(s), which is in turn a collection of SCTableViewCell(s) (much more on these two classes in the next two sections). Whenever you drag and drop a section to your UITableView in IB, the STV framework automatically adds it to the model at runtime. This enables you to easily add, remove or edit your sections at runtime using code. For example, to add an extra custom section at runtime, you'd use the model's addSection method as follows:
SCTableViewSection *customSection = [SCTableViewSection sectionWithHeaderTitle:@"My Custom Section"];
[self.tableViewModel addSection:customSection];
let customSection = SCTableViewSection(headerTitle: "My Custom Section")
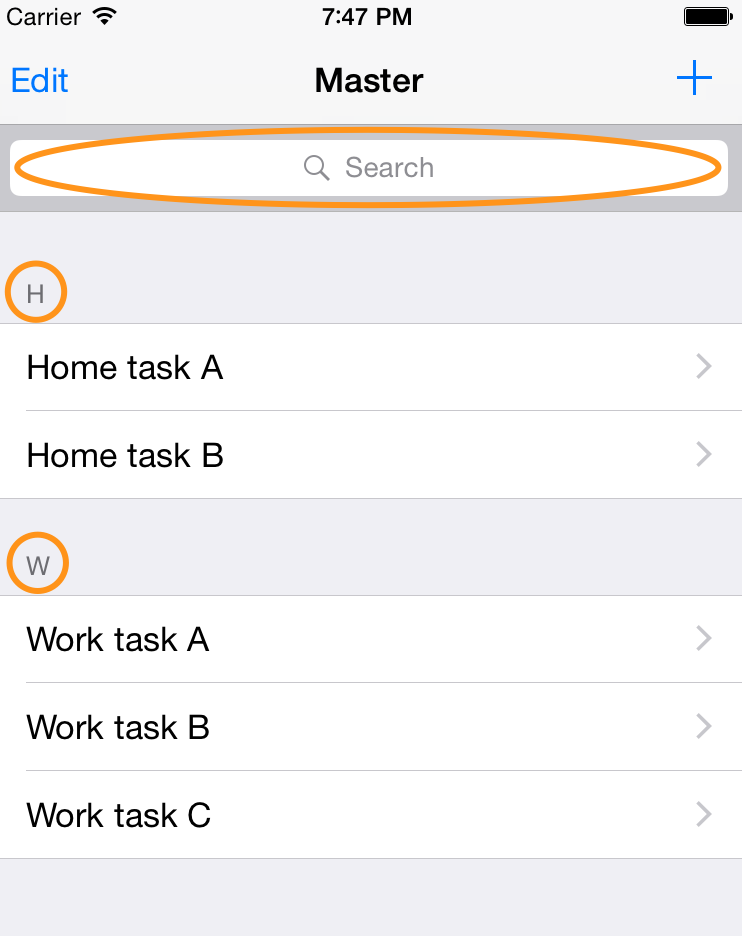
self.tableViewModel.addSection(customSection)While the basic SCTableViewModel requires you to manually add the sections yourself (either visually in IB or through code), other more specialized STV models can automatically generate all their sections based on the given data and your own custom logic, such as the popular SCArrayOfObjectsModel. This is really useful in situations where you'd like to have cells grouped (say) alphabetically, just like in Apple's Contacts app. Furthermore, SCArrayOfObjectsModel can provide automatic search functionality within all the objects it hosts. Since STV uses a regular SCTableViewModel by default, you'll need to create an SCArrayOfObjectsModel and pass that on to STV. STV will then use any section you add in IB to be a representative section for all the other sections it will automatically generate. For example, to provide alphabetical grouping and automatic search functionality to our CoreDataApp sample, add the following code to MasterViewController:
- (void)viewDidLoad {
    [super viewDidLoad];

    // Create the new objectsModel
    SCArrayOfObjectsModel *objectsModel = [[SCArrayOfObjectsModel alloc] initWithTableView:self.tableView];

    // Implement the sectionHeaderTitleForItem action to return the first character of each task's name
    objectsModel.modelActions.sectionHeaderTitleForItem = ^NSString*(SCArrayOfItemsModel *itemsModel, NSObject *item, NSUInteger itemIndex)
    {
        NSString *taskName = [item valueForKey:@"name"];

        // Return first charcter of taskName capitalized
        return [[taskName substringToIndex:1] uppercaseString];
    };

    // Enable automatic search functionality
    objectsModel.enableSearchController = YES;

    // Override STV's default SCTableViewModel with your new objectsModel
    self.tableViewModel = objectsModel;
}
override func viewDidLoad() {
super.viewDidLoad()
// Create the new objectsModel
let objectsModel = SCArrayOfObjectsModel(tableView: self.tableView)
// Implement the sectionHeaderTitleForItem action to return the first character of each task's name
objectsModel.modelActions.sectionHeaderTitleForItem =
{
(itemsModel, item, itemIndex)->String! in
let taskName = item.valueForKey("name") as! String
// Return first charcter of taskName capitalized
return taskName.substringToIndex(advance(taskName.startIndex, 1)).uppercaseString
}
// Enable automatic search functionality
objectsModel.enableSearchController = true
// Override STV's default SCTableViewModel with your new objectsModel
self.tableViewModel = objectsModel
}And the updated app would look like this:
STV Sections
STV sections are the logical abstraction of UITableView sections, and they're really useful for easily organizing your table view contents. STV has several kinds of sections, each specialized with performing a really common UITableView programming task.
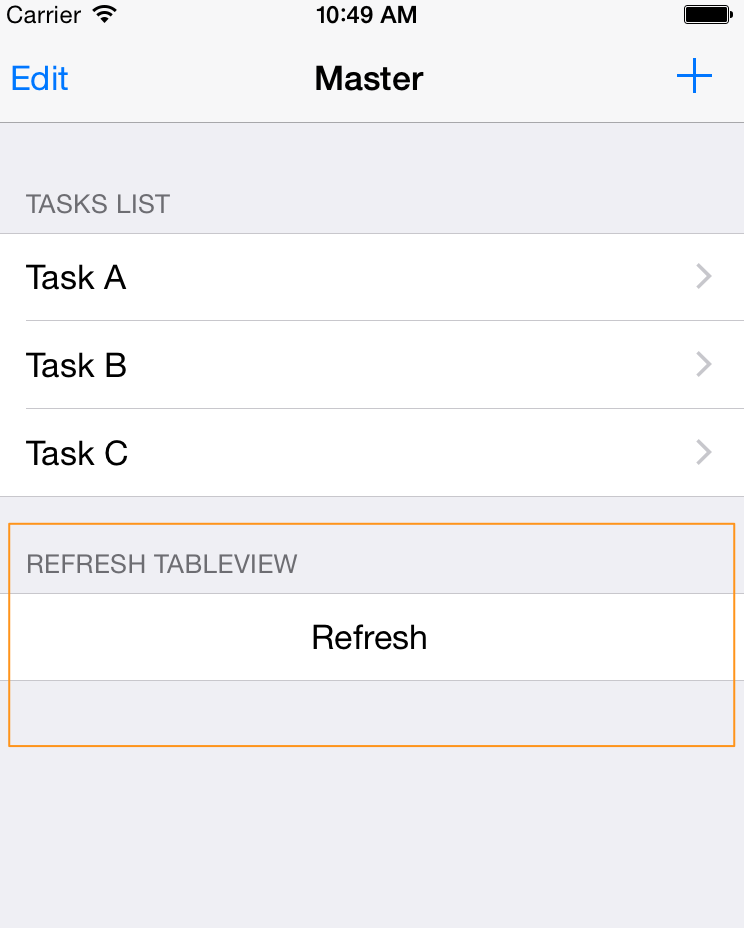
The most basic STV section is represented by the SCTableViewSection class. It simply enables you to add/remove whatever cells you wish to/from the section. For instance, the following code segment adds an extra section with a 'Refresh' cell to our CoreDataApp sample:
- (void)viewDidLoad {
    [super viewDidLoad];

    // Create the new section
    SCTableViewSection *refreshSection = [SCTableViewSection sectionWithHeaderTitle:@"Refresh TableView"];

    // Add it to the model
    [self.tableViewModel addSection:refreshSection];

    // Add a refresh cell to the section
    SCTableViewCell *refreshCell = [SCTableViewCell cellWithText:@"Refresh" textAlignment:NSTextAlignmentCenter];
    refreshCell.cellActions.didSelect = ^(SCTableViewCell *cell, NSIndexPath *indexPath)
    {
        [cell.ownerTableViewModel.tableView reloadData];
    };
    [refreshSection addCell:refreshCell];
}
override func viewDidLoad() {
super.viewDidLoad()
// Create the new section
let refreshSection = SCTableViewSection(headerTitle: "Refresh TableView")
// Add it to the model
self.tableViewModel.addSection(refreshSection)
// Add a refresh cell to the section
let refreshCell = SCTableViewCell(text: "Refresh", textAlignment: .Center)
refreshCell.cellActions.didSelect =
{
(cell, indexPath) in
cell.ownerTableViewModel.tableView.reloadData()
}
refreshSection.addCell(refreshCell)
}And the updated app would look like this:
Another type of STV sections is the popular SCArrayOfObjectsSection, which you've already used extensively in the Getting Started part of the manual. An SCArrayOfObjectsSection is able to fully generate its own cells based on an array of objects that is passed to it. Not only that, but it's also able to generate automatic detail views for each of its cells based you the data definitions you passed on to it. SCArrayOfObjectsSection also automatically carries on operations such as adding new objects (cells), removing objects, and rearranging objects. As you've probably guessed by now, this section is a really important part of your STV arsenal.
The following is a list of the different STV sections and their uses.
| SCTableViewSection | A basic section where cells can be manually added and removed. This section also serves as the superclass for all other sections. |
| SCObjectSection | A section that automatically generates its cells from the properties/attributes of a given object. |
| SCArrayOfObjectsSection | A section that automatically generates its cells from an list of any type of objects. |
| SCArrayOfStringsSection | A section that automatically generates its cells from a list of NSStrings. |
| SCSelectionSection | A section that provides selection functionality from a list of given strings. |
| SCObjectSelectionSection | A section that provides selection functionality from a list of given objects. |
STV Cells
STV basic cells correspond to regular UITableView cells, and are represented by the SCTableViewCell class (which is a direct descendant of UITableViewCell). STV cells are very special in the fact that they can bind themselves to certain properties of a given object, and automatically fetch their values from this property/attribute. For instance, an STV cell with a UITextField can automatically fetch the text field's text from its bound object. In addition, once the user has changed this text, it will also automatically commit the text back to the object.
STV cells are also a lot easier to deal with than regular UITableViewCells, since they pack a lot of convenience functionality. For instance, an STV cell hosts collection of cell actions that get triggered whenever a cell event occurs, giving you the opportunity to easily provide custom logic in response to any of these actions.
myCell.cellActions.didSelect = ^(SCTableViewCell *cell, NSIndexPath *indexPath)
{
    NSLog(@"Cell at indexPath:%@ has been selected.", indexPath);
};
myCell.cellActions.didSelect =
{
(cell, indexPath) in
NSLog("Cell at indexPath:%@ has been selected.", indexPath)
}STV provides a lot of specialized cells that cover a lot of the common cell functionality found in most modern applications. Most of the following cells are automatically created for you when you pass on your data definition to STV, but can also be manually created if you wish to.
| SCTableViewCell | A basic cell that serves as a superclass for all the other cell types. Any cell used with the STV framework must descend from this cell. |
| SCControlCell | Serves as an abstract superclass for any cell with a UIControl control. |
| SCLabelCell | A cell with a UILabel control that is used to display static text. |
| SCTextViewCell | A cell with a built-in UITextView control. This cell automatically resizes to fit the contents of its text view. |
| SCTextFieldCell | A cell with a built-in UITextField control. |
| SCNumericTextFieldCell | A cell with a built-in UITextField control that only accepts numeric data. |
| SCSliderCell | A cell with a built-in UISlider control. |
| SCSegmentedCell | A cell with a built-in UISegmentedControl. |
| SCSwitchCell | A cell with a built-in UISwitch control. |
| SCDateCell | A cell that provides a built-in UIDatePicker to choose a date with. |
| SCImagePickerCell | A cell that provides a UIImagePickerController to pick an image with. |
| SCSelectionCell | A cell that automatically generates a detail view with an SCSelectionSection to provide the user a list of strings to choose from. |
| SCObjectSelectionCell | A cell that automatically generates a detail view with an SCObjectSelectionSection to provide the user a list of objects to choose from. |
| SCObjectCell | A cell that automatically generates a detail view with an SCObjectSection that displays the contents of its bound object. |
| SCArrayOfObjectsCell | A cell that automatically generates a detail view with an SCArrayOfObjectsSection to present a list of objects to the user. |
| SCCustomCell | This cell enables you to define your own custom cells. All custom cells must be an instance or a subclass of this cell. |
STV Data Definitions
Data definitions are what enables the STV framework to fully understand your data graph with all its relationships and property types. Without data definitions, you would need to construct all the aforementioned STV elements manually yourself instead of having everything automatically generated for you. In the Getting Started section, you already used data definitions in the CoreDataApp to further define how you want the UI for a TaskEntity to look like, in addition to defining the UI for its one-to-many relationship with TaskStepEntity. And the best part is: STV makes it really simple to construct these data definitions visually right in IB.
A data definition is represented by the class called SCDataDefinition, which acts as an abstract base class for all the other specialized data definition types. Every data definition is basically a collection of Property Definitions, represented by the SCPropertyDefinition class. Within each property definition, you can set the type of UI generated for each property, and you can also fine tune the generated UI using a set of attributes (all of which are also exposed in IB).
STV defines a special data definition type for each kind of the common data models currently popular within the iOS development community. The following is the list of data definition types shipped with STV:
| SCClassDefinition | Used to fully define regular NSObject descendant classes. |
| SCEntityDefinition | Used to fully define Core Data entities. |
| SCWebServiceDefinition | Used to fully define remote web services. |
| SCParseDefinition | Used to fully define Facebook's parse.com classes. |
| SCiCloudKeyValueDefinition | Used to fully define iCloud key-value stores. |
| SCUserDefaultsDefinition | Used to fully define NSUserDefaults data keys. |
| SCDictionaryDefinition | Used to fully define the structure of a regular NSDictionary. |
Even though all of these different kinds of data definitions can be fully constructed in code, it's much easier for you to construct them visually in IB just as you did in the Getting Started section. Once you've created the data definitions in IB, you can always access them in code if you wish for further runtime customizations. For instance, the following code snippet changes the default title of the TaskEntity's 'details' attribute from 'Details' to 'Task Details'.
- (void)viewDidLoad {
    [super viewDidLoad];

    // Fetch the entity definition created in IB
    SCEntityDefinition *taskEntityDef = (SCEntityDefinition *)[self dataDefinitionWithIBName:@"TaskEntity"];

    // Fetch the property definition for the 'details' attribute
    SCPropertyDefinition *detailsPDef = [taskEntityDef propertyDefinitionWithName:@"details"];

    // Set the new title for the property definition
    detailsPDef.title = @"Task Details";
}
override func viewDidLoad() {
super.viewDidLoad()
// Fetch the entity definition created in IB
let taskEntityDef = self.dataDefinitionWithIBName("TaskEntity") as! SCEntityDefinition
// Fetch the property definition for the 'details' attribute
let detailsPDef = taskEntityDef.propertyDefinitionWithName("details")
// Set the new title for the property definition
detailsPDef.title = "Task Details"
}STV Actions
Actions are an integral part of the STV framework's architecture, and they provide a really easy way for you to provide your own custom logic in response to countless different triggers within the framework. In fact, you've already used actions several times in previous examples to get notified when a certain cell has been selected and were able to provide some custom code in response to that.
The STV framework has three broad action categories: Cell Actions, Section Actions, and Model Actions.
Cell Actions
Cell actions enable you to provide custom behavior in response to many of the common cells different events. For example, to provide a custom behavior when a certain cell is displayed, you simply set the willDisplay SCCellActions action:
myCell.cellActions.willDisplay = ^(SCTableViewCell *cell, NSIndexPath *indexPath)
{
    NSLog(@"Cell at indexPath:%@ is about to be displayed.", indexPath);
};
myCell.cellActions.willDisplay =
{
(cell, indexPath) in
NSLog("Cell at indexPath:%@ is about to be displayed.", indexPath)
}The real power of cell actions however is that they need not be directly set on the cell itself, but can rather be set on several different levels: the model level, the section level, the cell level, the data definition level, and the property definition level.
The model level. When a cell action is set on the model level, it will be applied to every single cell contained in that model. For instance, the following code placed in viewDidLoad of MasterViewController of our CoreDataApp sample will set the background color of every cell in MasterViewController to yellow.
self.tableViewModel.cellActions.willDisplay = ^(SCTableViewCell
*cell, NSIndexPath *indexPath)
{
     cell.backgroundColor = [UIColor yellowColor];
};
self.tableViewModel.cellActions.willDisplay = { (cell, indexPath) in cell.backgroundColor = UIColor.yellowColor() }
The section level. When a cell action is set on the section level, it will be applied to every single cell contained within that section. For instance, the following code will set the background color of every cell in the very first section of our MasterViewController to blue.
SCTableViewSection *firstSection = [self.tableViewModel sectionAtIndex:0];
firstSection.cellActions.willDisplay = ^(SCTableViewCell *cell, NSIndexPath *indexPath)
{
     cell.backgroundColor = [UIColor blueColor];
};
let firstSection = self.tableViewModel.sectionAtIndex(0) firstSection.cellActions.willDisplay = { (cell, indexPath) in cell.backgroundColor = UIColor.blueColor() }
The cell level. When a cell action is set on the cell level, it will only be applied to this specific cell. Cell level actions will override any section level actions, and section level action will override any model level actions.
The data definition level. When a cell action is set on the data definition level, it will be applied to every single cell generated by that data definition. For instance, the following code will set the background color of every cell task entity detail view to orange.
SCDataDefinition *taskEntityDef = [self dataDefinitionWithIBName:@"TaskEntity"];
taskEntityDef.cellActions.willDisplay = ^(SCTableViewCell *cell, NSIndexPath *indexPath)
{
     cell.backgroundColor = [UIColor orangeColor];
};
let taskEntityDef = self.dataDefinitionWithIBName("TaskEntity") taskEntityDef.cellActions.willDisplay = { (cell, indexPath) in cell.backgroundColor = UIColor.orangeColor() }
The property definition level. When a cell action is set on the property definition level, it will only be applied to the cell generated by that specific property definition. For instance, the following code will set the background color of the task 'details' cell in the task entity detail view to purple.
SCDataDefinition *taskEntityDef = [self dataDefinitionWithIBName:@"TaskEntity"];
SCPropertyDefinition *detailsPDef = [taskEntityDef propertyDefinitionWithName:@"details"];
detailsPDef.cellActions.willDisplay = ^(SCTableViewCell *cell, NSIndexPath *indexPath)
{
     cell.backgroundColor = [UIColor purpleColor];
};
let taskEntityDef = self.dataDefinitionWithIBName("TaskEntity") let detailsPDef = taskEntityDef.propertyDefinitionWithName("details") detailsPDef.cellActions.willDisplay = { (cell, indexPath) in cell.backgroundColor = UIColor.purpleColor() }Property definition level cell actions always override the data definition level ones.
Section Actions
Section actions enable you to provide custom behavior in response to STV section related events. For example, the following action fires right before the section’s automatically generated detail view is presented, giving you the chance to do any required customizations:
mySection.sectionActions.detailModelWillPresent = ^(SCTableViewSection *section, SCTableViewModel *detailModel, NSIndexPath *indexPath)
{
    detailModel.viewController.title = @"My custom title";
};
mySection.sectionActions.detailModelWillPresent =
{
(section, detailModel, indexPath) in
detailModel.viewController.title = "My custom title"
}Section actions can be set at two levels: the model level and the section level. Setting the action at the model level fires for every single section in the model. Setting it at the section level fires only for this specific section. Similarly to cell actions, setting an action at the section level overrides any identical action set at the model level.
Model Actions
Similar to cell actions and section actions, model actions also enable you to provide a set of custom behaviors in response to STV model events. For example, one very common model action is the one that gets fired when the model has entered editing mode:
self.tableViewModel.modelActions.didBeginEditing = ^(SCTableViewModel *tableModel)
{
    NSLog(@"The model has entered editing mode.");
};
self.tableViewModel.modelActions.didBeginEditing =
{
(tableModel) in
NSLog("The model has entered editing mode.")
}Model actions are available on only one level, the model level.